Running Code from GitHub Repositories
Learn how to run source code repositories hosted on GitHub on Signaloid's uncertainty-tracking processors.
Access to GitHub repositories
The Signaloid Cloud Developer Platform Repositories page lets you compile and execute existing code contained in GitHub code repositories.
On the Repositories page, you can connect publicly-accessible GitHub repositories to your account using the
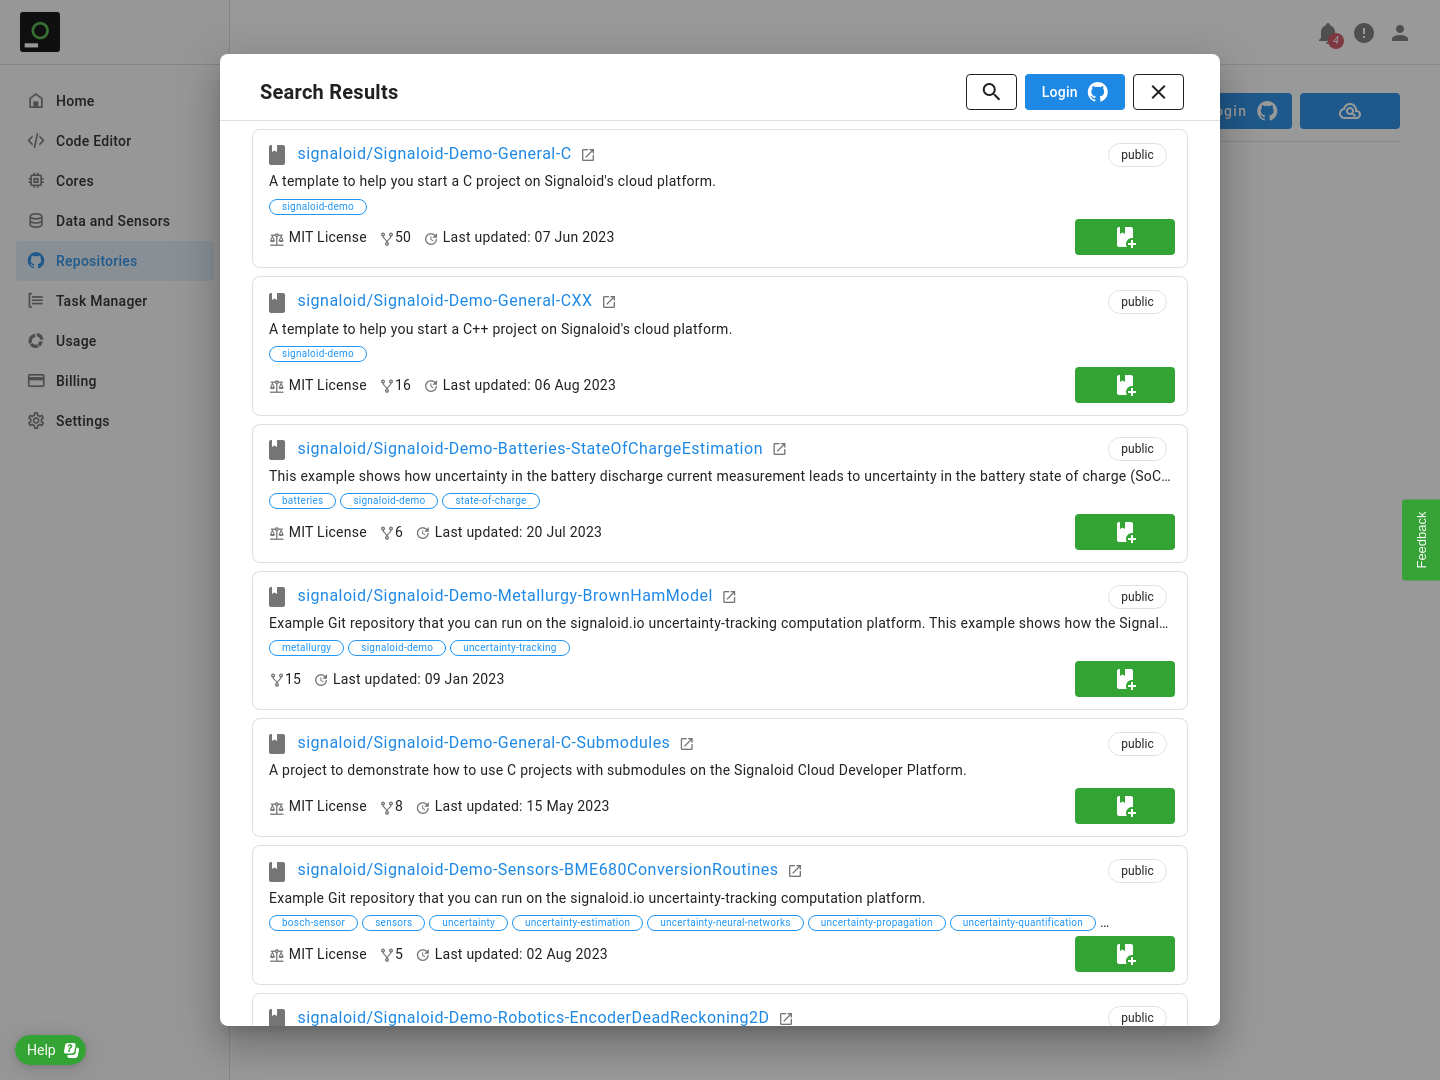
"Search GitHub" button () (see Search Repositories
for more details). Figure 1 shows the results of a GitHub search for the Signaloid keyword.
You can also connect private repositories to your account by signing in to your GitHub account from the Signaloid Cloud Developer Platform using the "Login to GitHub" button () on the Repositories page (see GitHub Login for more details).
The Signaloid Cloud Compute Engine calls the GitHub API for accessing and managing connected GitHub repositories. The GitHub API imposes strict limits on the number of unauthenticated API requests that it serves. If you choose to not login to GitHub some of the API requests issued on behalf of your Signaloid account might be rejected by GitHub.
Signaloid keyword.Connecting GitHub Repositories
You can connect a repository by clicking the "Connect to Repository" green button () attached to every repository in the search dialog, as you can see in Figure 1. Depending on your Signaloid account Tier, there is an upper bound to the number of repositories that you can have simultaneously connected. If you have logged in to GitHub from the Signaloid Cloud Developer Platform then the "Connect to Repository" green button () also appears at the Repositories page and enables you to search and connect your private repositories. When you connect a private or public repository, the Signaloid Cloud Compute Platform performs a number of checks on the repository as Figure 2 shows. The checks examine the structure of the repository and look for files that assist the build process of the repository on the Signaloid Cloud Compute Engine (see Repository Building Configuration Options for more details).
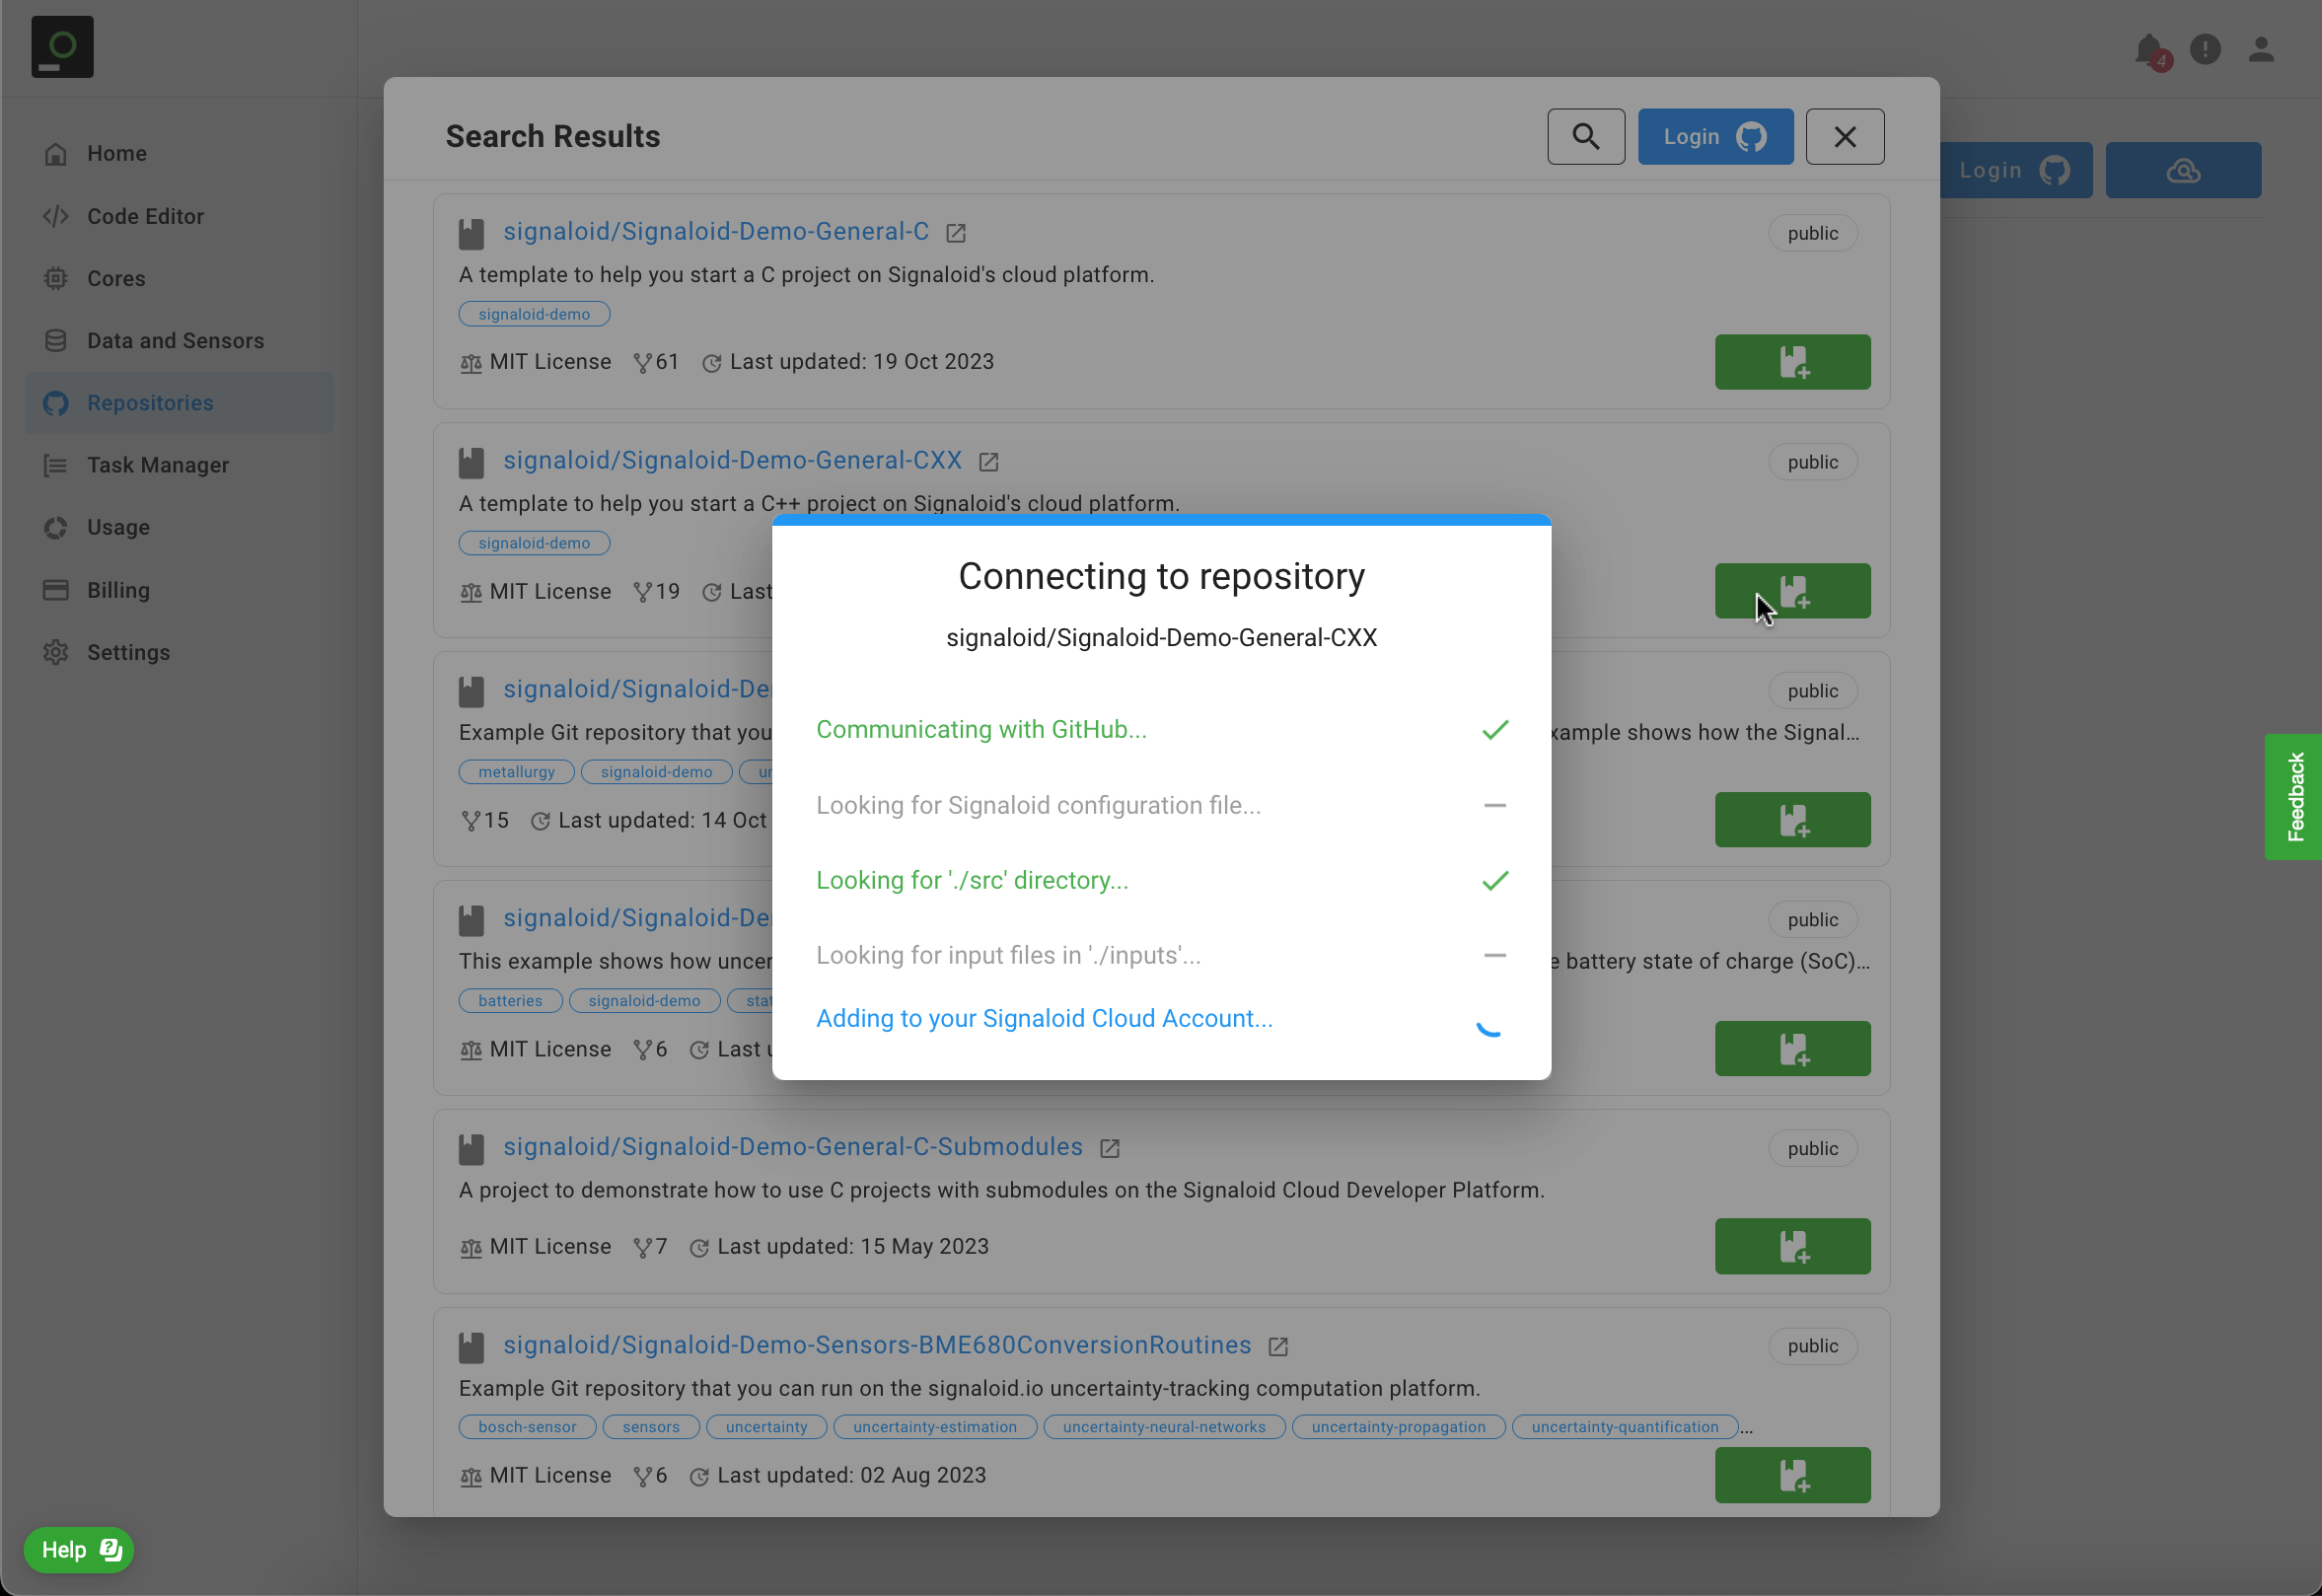
The only default requirement when connecting a GitHub repository in the Signaloid Cloud Compute Platform is for it to contain a top-level src folder.
You can still ask the Signaloid Cloud Compute Platform to force add this repository, but you will have to instruct its build process using its config.mk
(see Repository Building Configuration Options for more details).
Repository Building Configuration Options
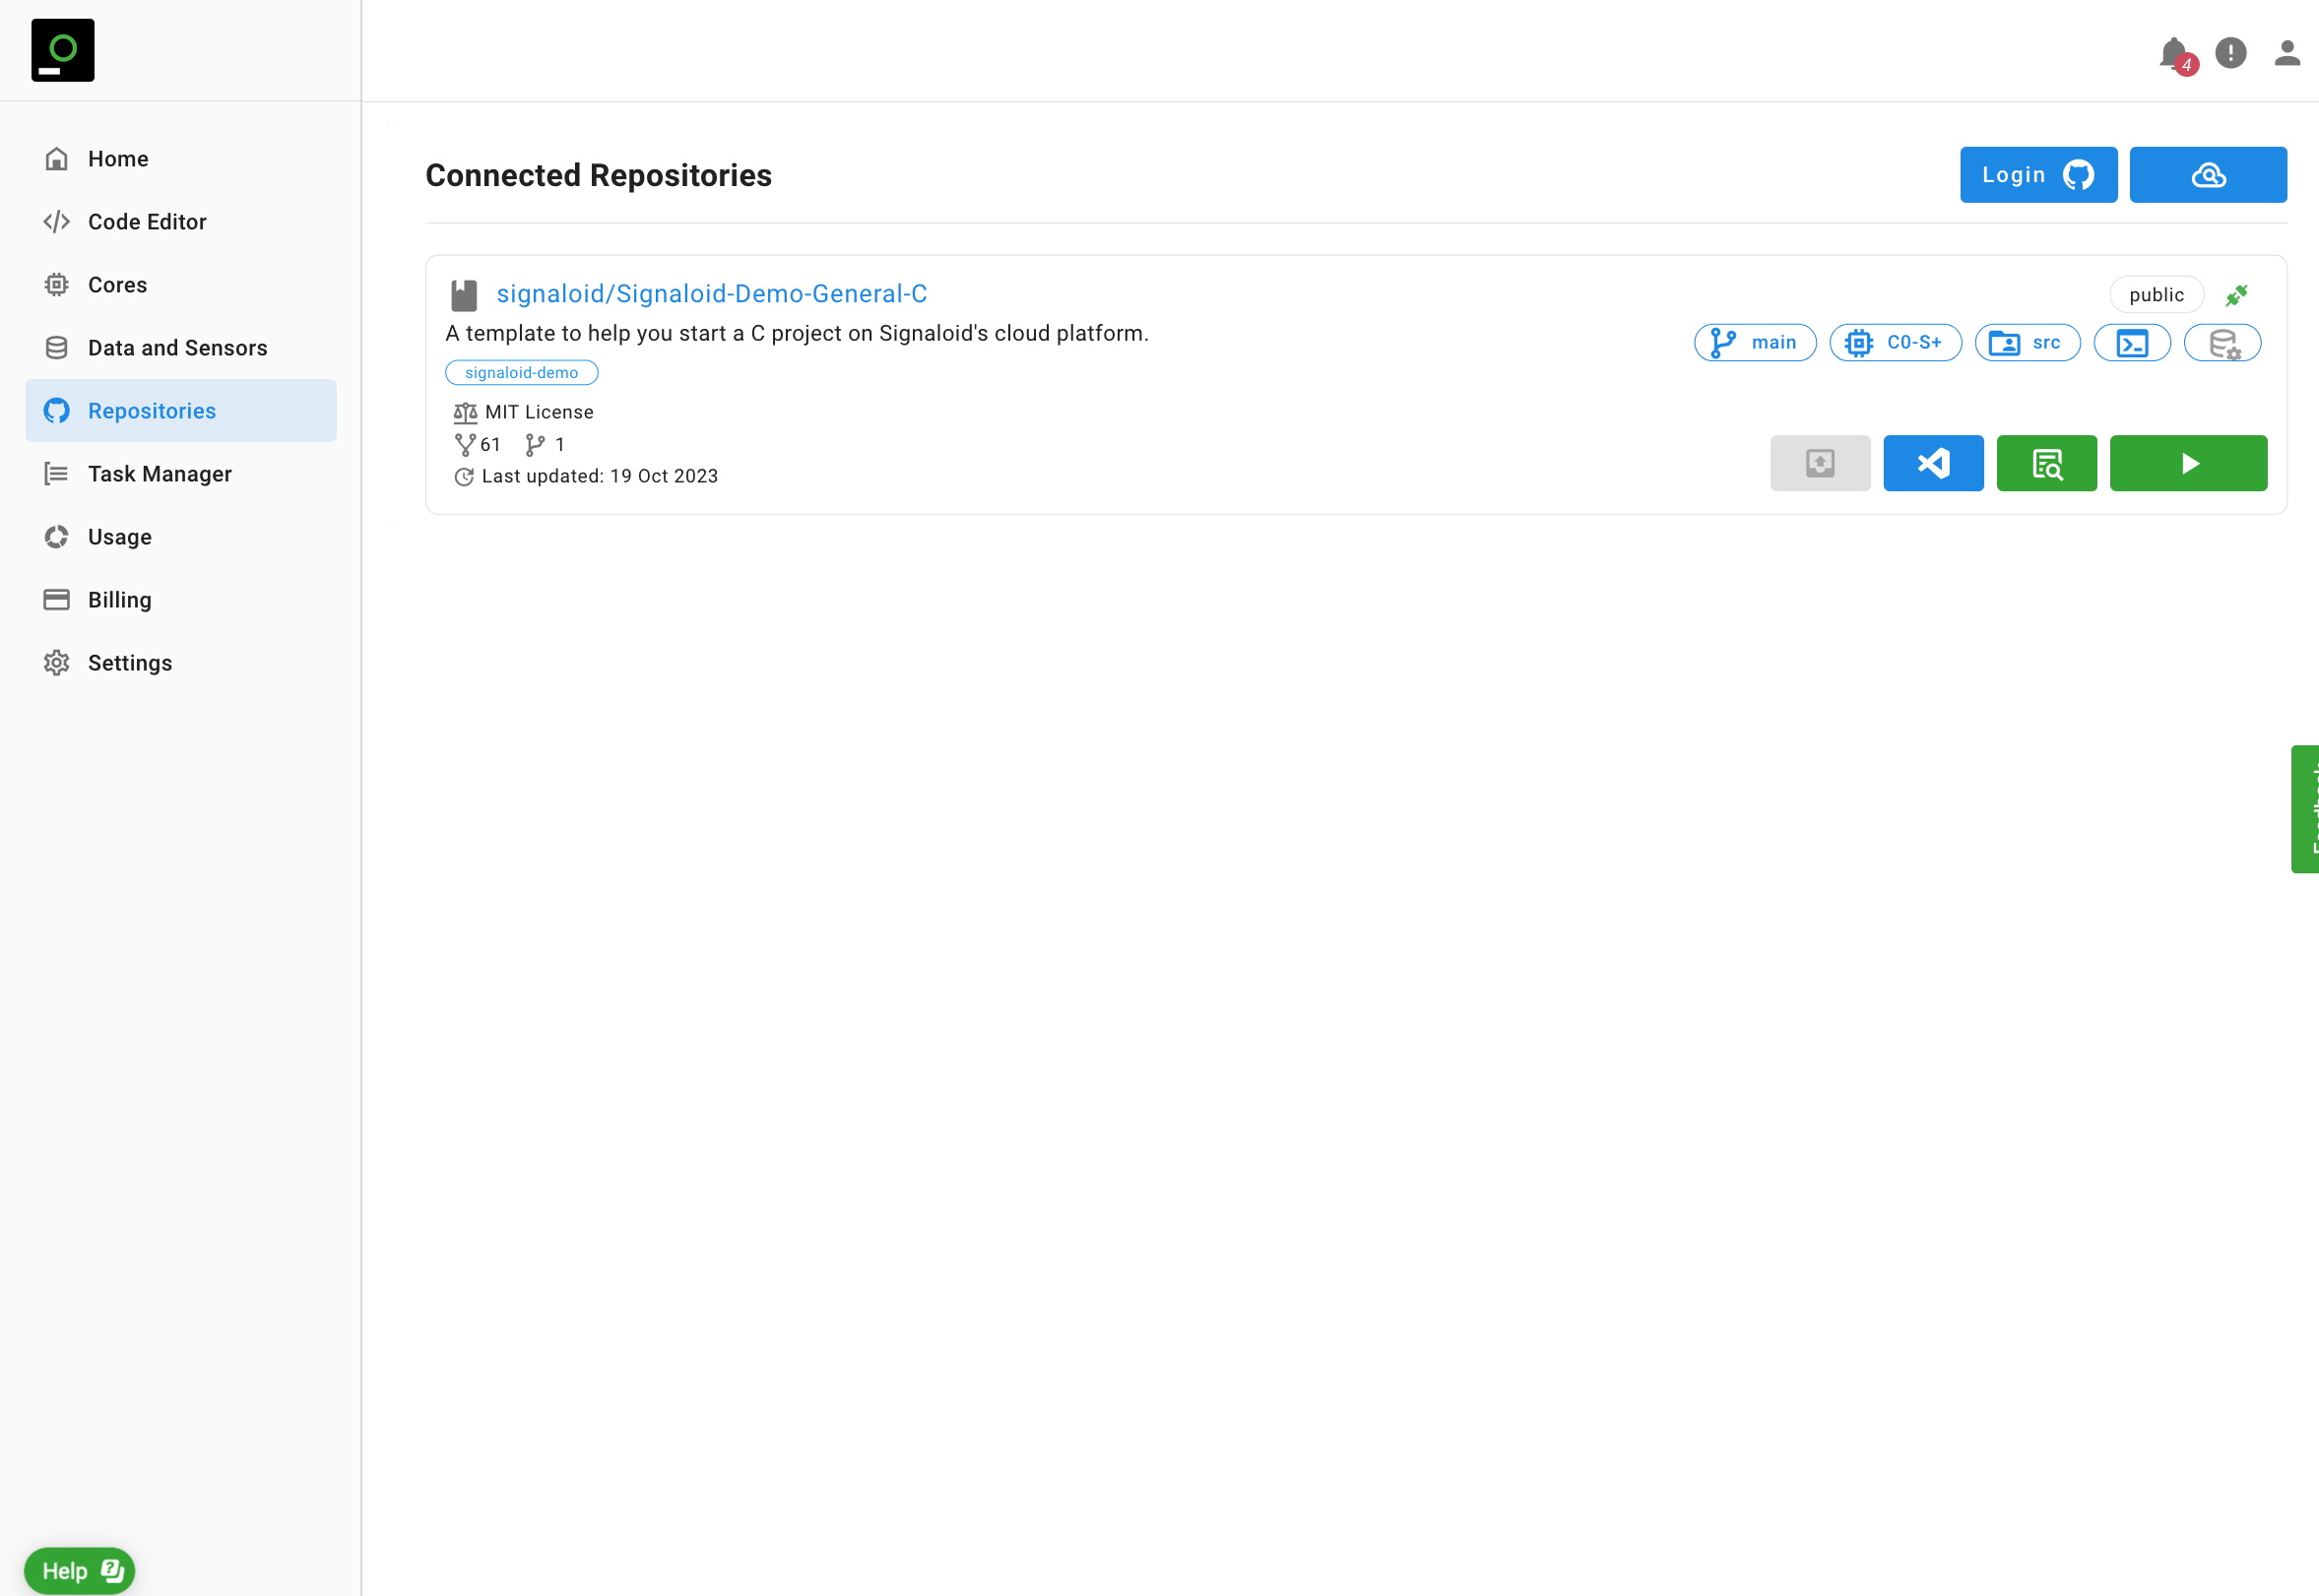
Figure 2 shows the Repository card of your successfully connected GitHub repository.
You can select the branch of the repository that you want to build by clicking on the button with the git branch icon ().
By clicking this button you will see a drop-down list of the branches of your connected repository (see Selecting Execution Core).
The Signaloid Cloud Compute Engine will clone the HEAD of your chosen branch.
The Signaloid Cloud Compute Engine currently supports cloning of submodules with HTTPS remote origins. If your repository includes a submodule with an SSH remote origin, you will need to change the remote origin to HTTPS connecting the repository to the Signaloid Cloud Developer Platform, otherwise the repository cloning will fail and building of the repository will stop with “Build Error” status.
By default the building process of a GitHub repository on the Signaloid Cloud Compute Engine will search for C/C++ source code files in the top-level src directory of your connected GitHub repository.
You can override this default search directory by clicking on the "Build Directory" button (). Using the "Build Directory" button you
can select one of the sub-directories of your connected GitHub repository. The Signaloid Cloud Compute Engine will look for C/C++ source code files in the selected directory.
The Signaloid Cloud Compute Engine will include in its search for C/C++ files all the sub-directories of the build directory of your repository, whether the default src or an overridden one.
The most fine-grained way of configuring the build process of your connected GitHub repository is by including a config.mk at the build directory of your repository, whether the default src or an overridden one.
You can include the following Makefile variables in your config.mk:
SOURCES: Using this Makefile variable you can point the Signaloid Cloud Compute Engine to which source file you want to compile during the building of your connected repository. The Signaloid Cloud Compute Engine will not search for any other files in your build directory. Example usage:
SOURCES = \
	main.c \
	dir1/oneCFile.c

SOURCES += dir2/oneCPPFile.cpp
CFLAGS: Using this Makefile variable you can add compilation flags for the C compiler of the Signaloid Cloud Compute Engine build process. We suggest the addition of flags that do not affect the compilation output, e.g., optimization flags. You can use this variable for pointing to include directories on defining C pre-processor symbols:
CFLAGS = -I../include/ -DDEBUG
CXXFLAGS: Using this Makefile variable you can add compilation flags for the C++ compiler of the Signaloid Cloud Compute Engine build process. We suggest the addition of flags that do not affect the compilation output, e.g., optimization flags or C++ version. You can use this variable for pointing to include directories on defining C++ pre-processor symbols:
CXXFLAGS = -I../include/ -DDEBUG
LDFLAGS: Using this Makefile variable you can add flags for the linker of Signaloid Cloud Compute Engine build process. You can use this variable to point to directories of your GitHub repository where you have committed pre-compiled static libraries built for the Signaloid Cloud Compute Engine.
LDFLAGS = -L../libs/
LIBS: Using this Makefile variable you can instruct the linker of the Signaloid Cloud Compute Engine build process to link against pre-compiled static libraries that you have included in your repository. For example, for your pre-compiled librarylibmylib.ayou can use:
LIBS = -lmylib
Running Connected Repositories
The Execution Core selection button (), allows you to set the Signaloid C0 processor core that you want to use to run your connected GitHub repository. You can select a core from your the list of your available C0 cores. See the Creating Custom Cores section for more information about your default Signaloid cores and how to create custom cores. Click on the "Discover Variables" () button to trace variables when running your connected GitHub repositories on Signaloid C0 Reference cores. For details on the necessary steps for tracing variables, see Reference Execution.
Click the green "Compile and Run" () button to build and run your connected GitHub repository.
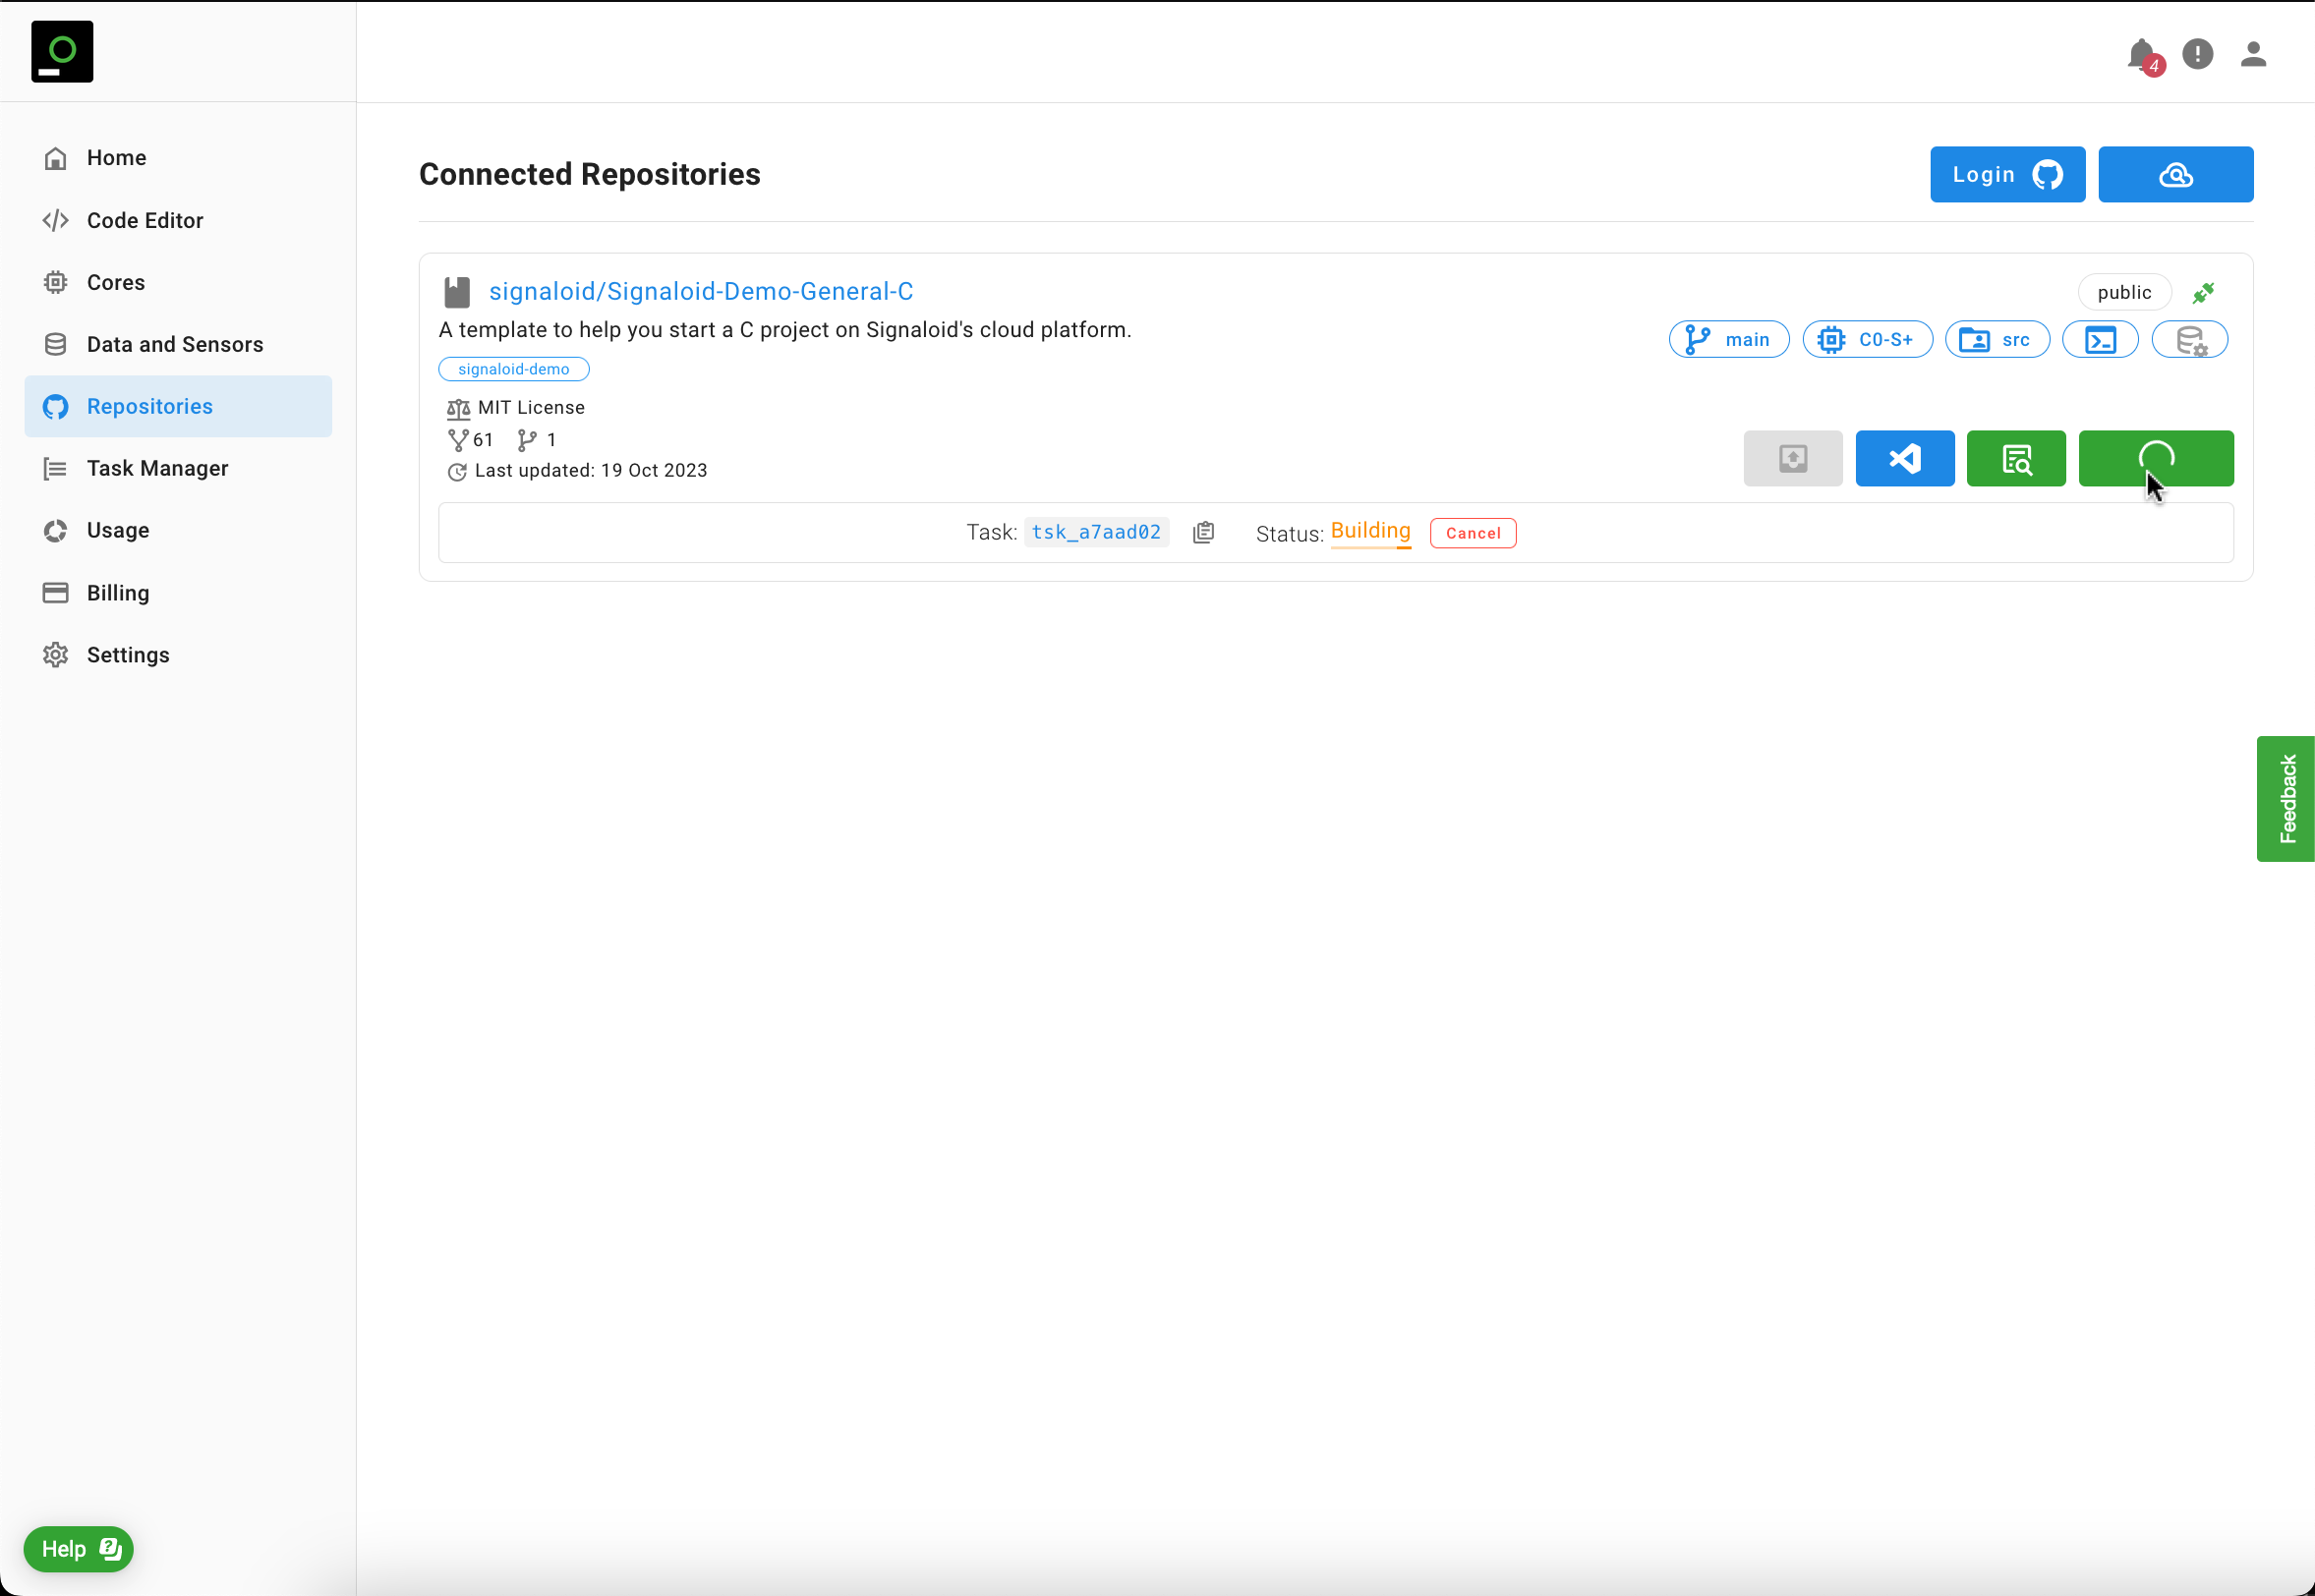
Every application execution on the Signaloid Cloud Developer Platform is called a Task and the Compute Engine
assigns it a Task ID: a unique string that globally identifies the Task. The Signaloid Cloud Developer Platform displays the Task ID and the Task status next to
the "Compile and Run" () button. When the Task status becomes Completed it means the
application finished execution successfully. You can view the output of past repository Tasks by navigating to the
Task Manager.
A Task is a single execution of an application on the Signaloid Cloud Developer Platform or the Signaloid Cloud Compute Engine.
You can copy the Task ID using the "Copy Task ID to clipboard" button ().
The Task status transitions through the states Initializing, Accepted, Building, In Progress, and Completed.
Figure 3 shows Task status during the building of a connected GitHub repository. You can see the unique Task ID next to the "Task" label and the Building status.
If there are compilation errors when building your application, the Signaloid Cloud Developer Platform will set the Task status to Stopped and surface
the compilation error at the build tab of the pop-up results panel. You can cancel the build and the Task execution stages using the "Cancel" button.
Building. You can cancel the build and the Task execution using the "Cancel" button.After a completed execution of a connected GitHub repository, a pop-up results panel appears with the results of the execution.
As Figure 4 shows, the results panel includes the stdout, the stderr, the build, and the runtime information tabs:
- The
stdouttab shows the output of your application to its standard output file descriptor. Printed variables that have associated uncertainty are in underlined and in green typeface. Hovering over these values or clicking them shows a plot of the uncertainty associated with the value in the form of a histogram. - The
stderrtab shows the output of your application to its standard error file descriptor. - The build tab shows any errors and warnings from the build process of your application.
- The runtime information tab shows system information about the executed Task, such as the actual amount of execution time on the C0 processor and the total dynamic instruction credits the Task consumed.
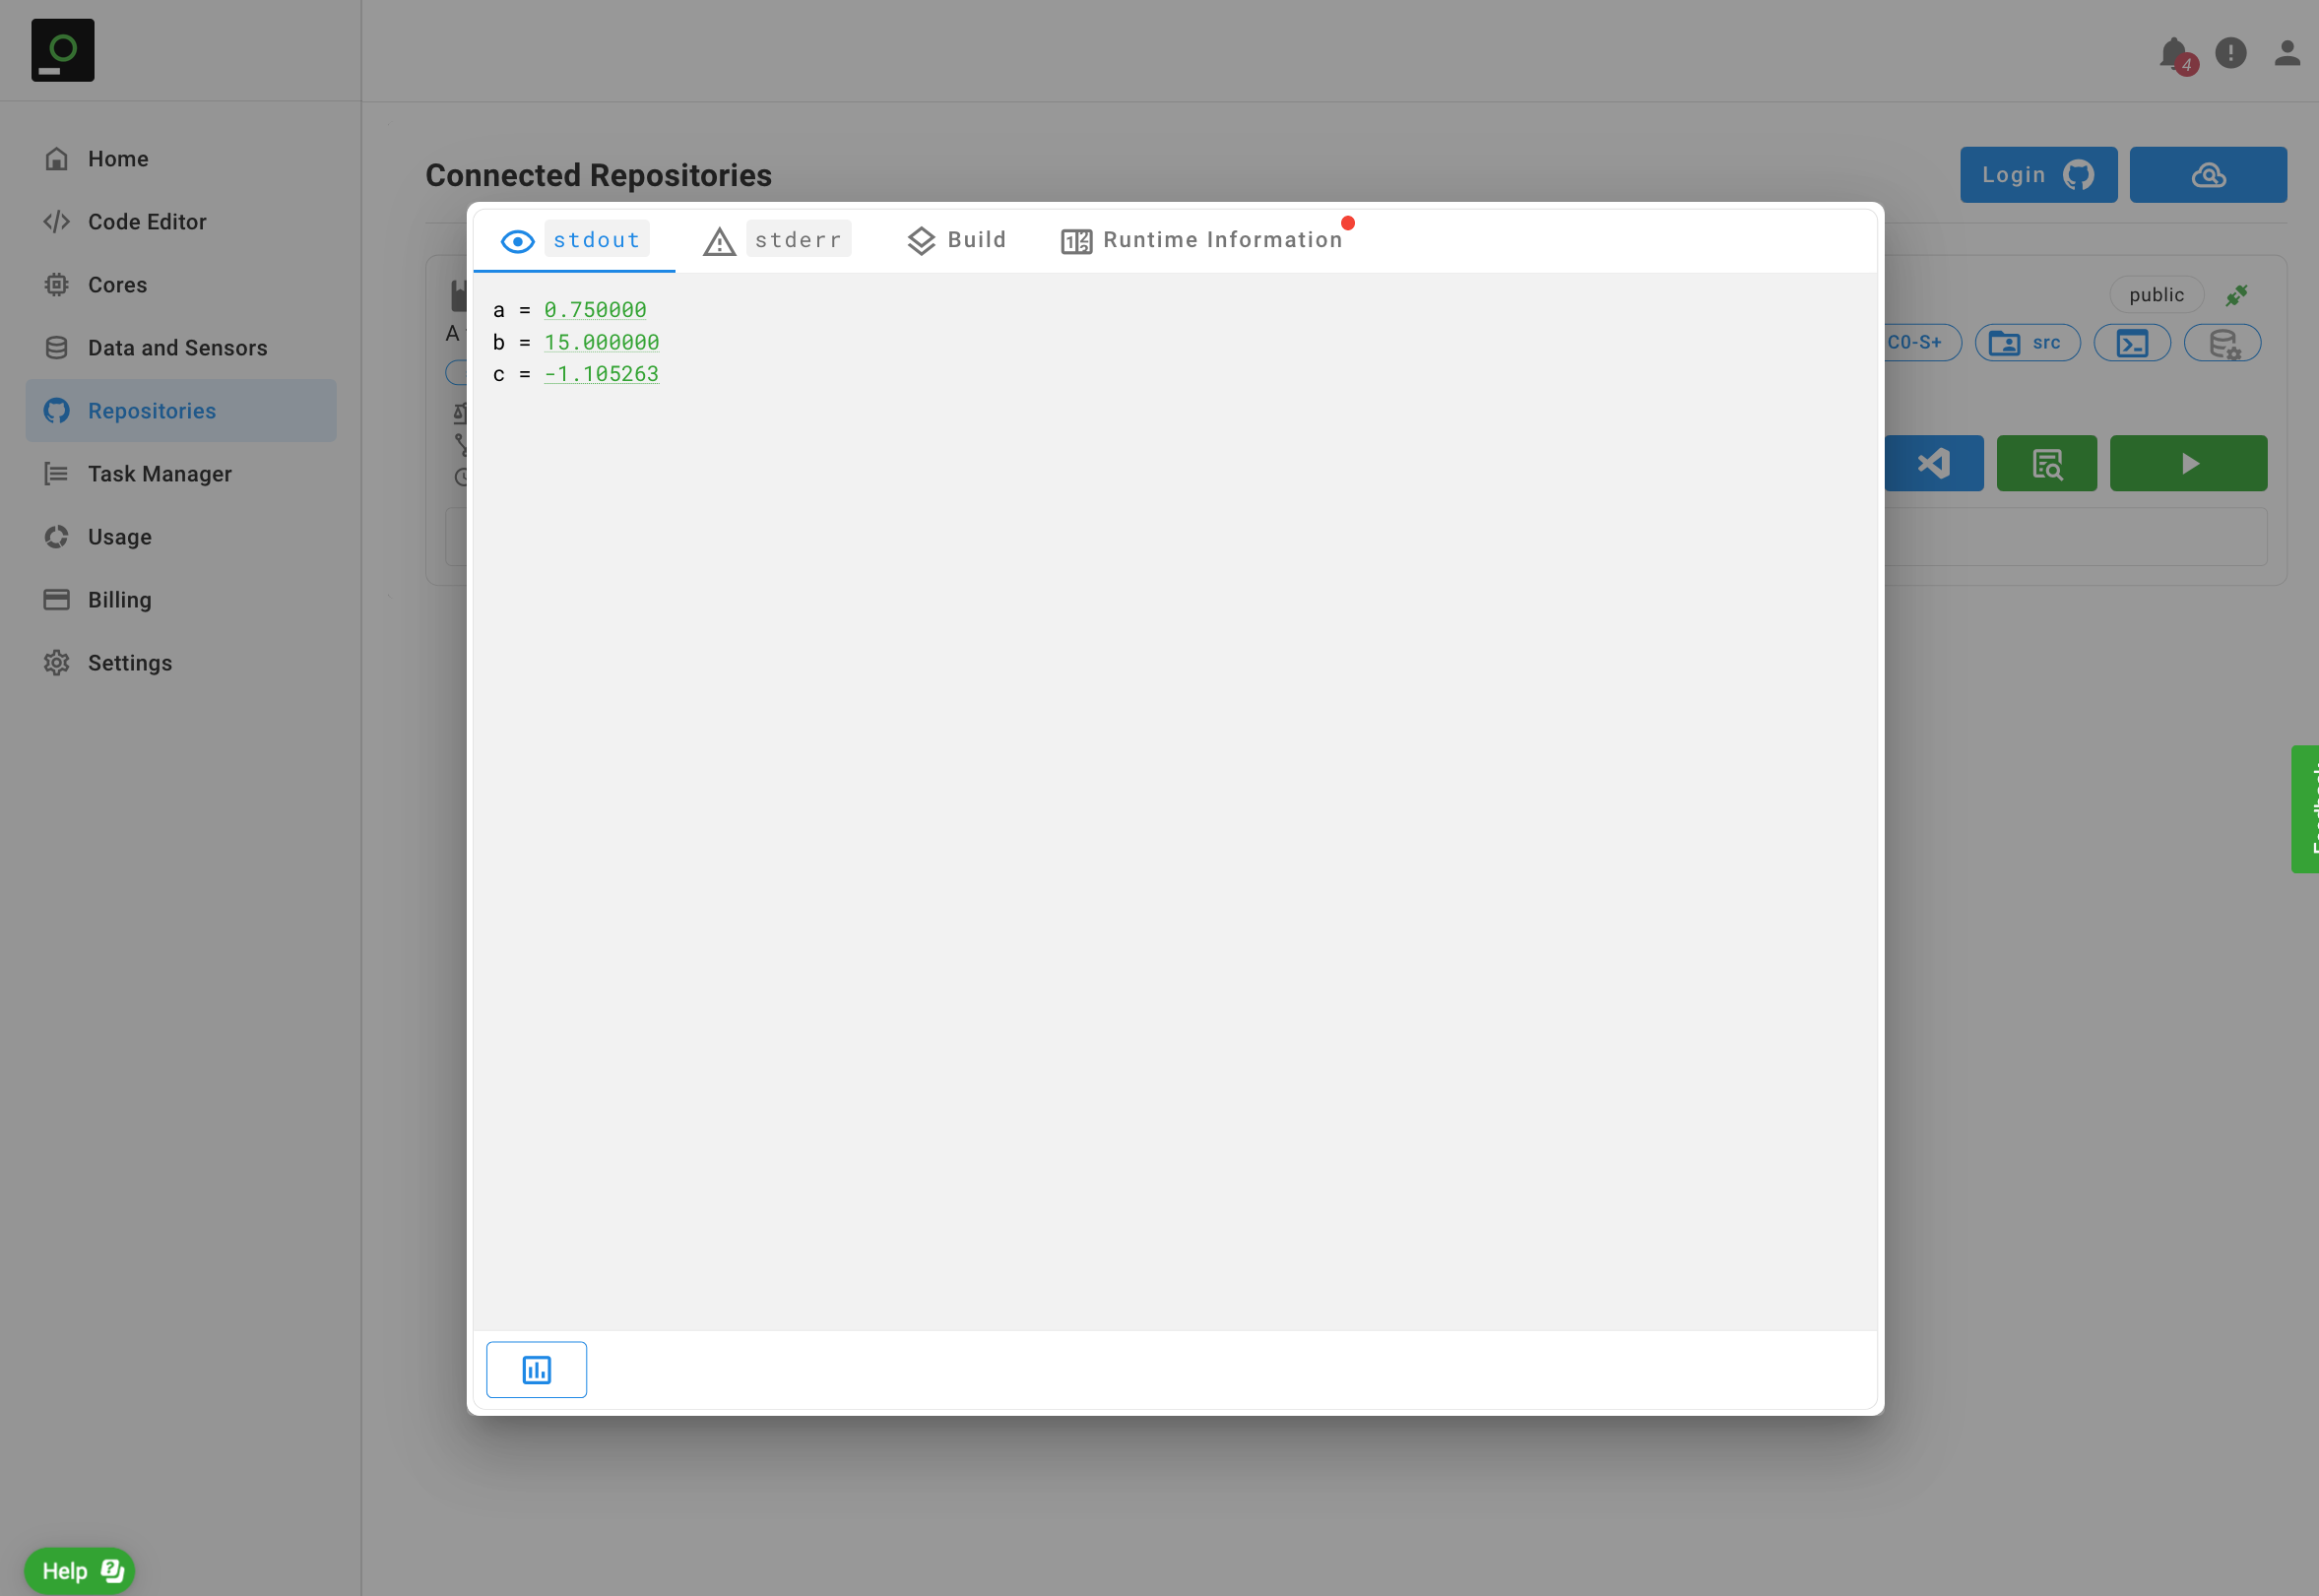
Figure 5 shows the output of the Signaloid-Demo-General-C connected GitHub repository. When you hover your mouse over a highlighted, printed value you can see a plot of its associated distributional information.
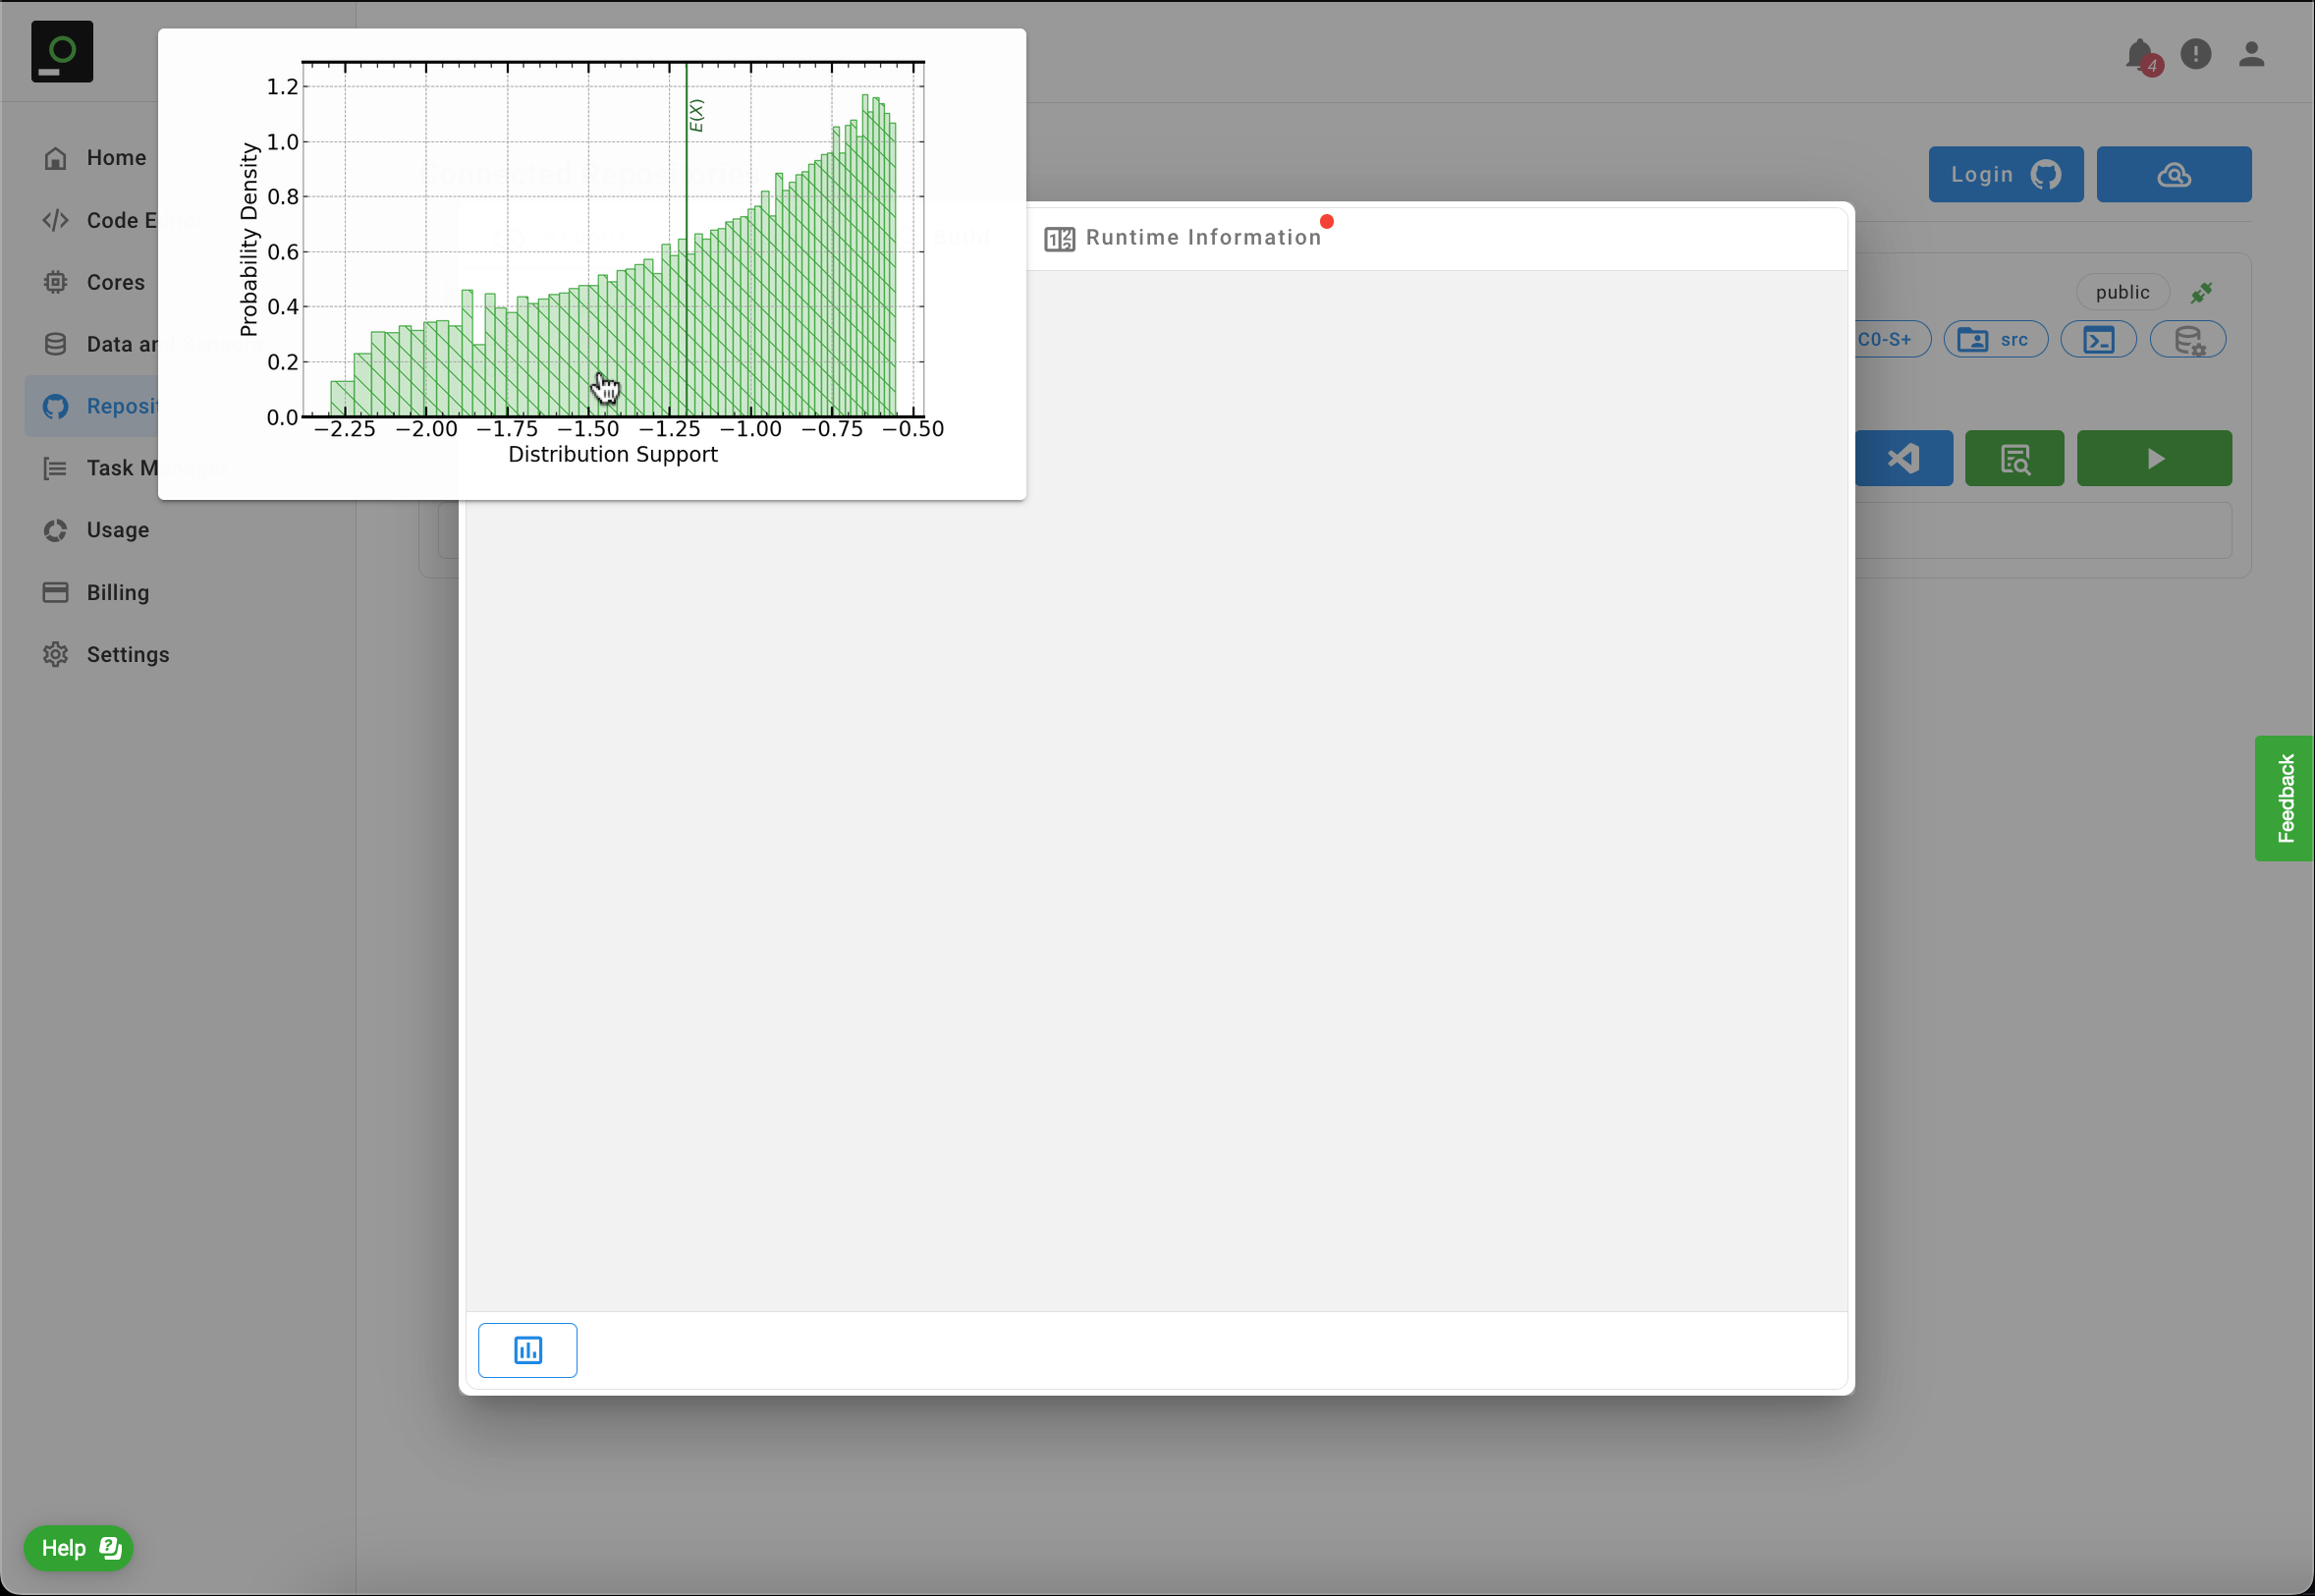
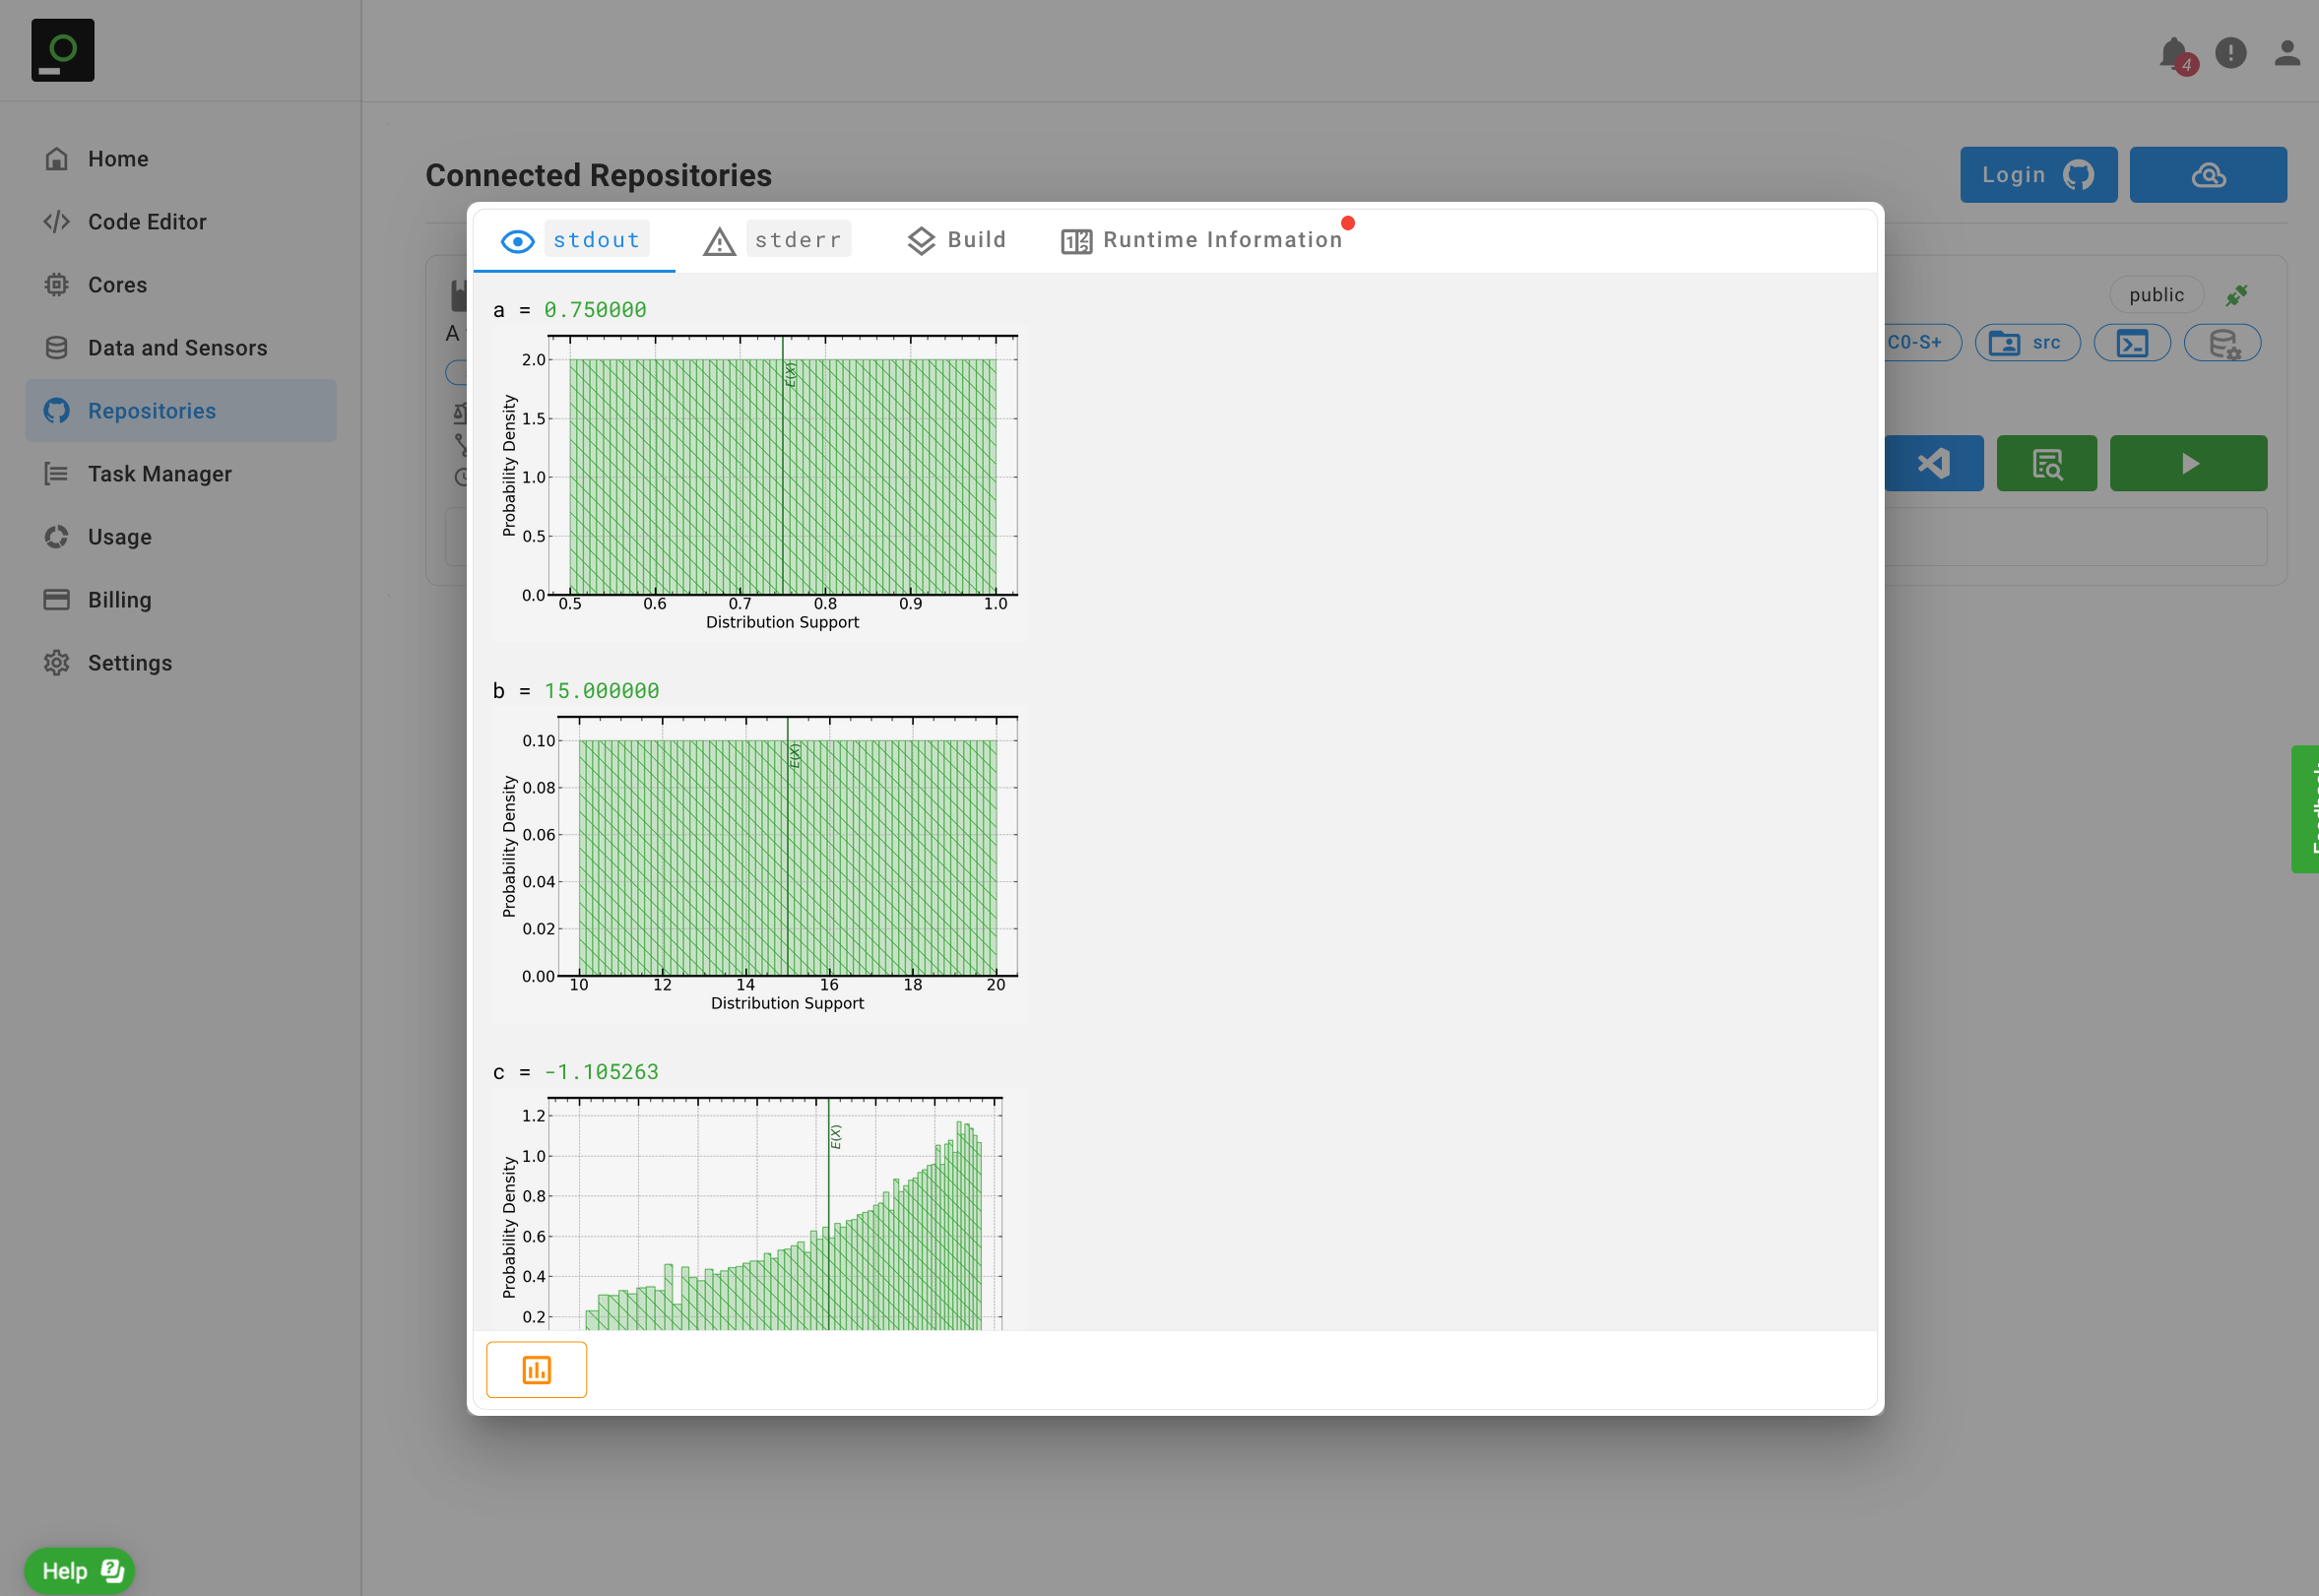
stdout tab of the results Panel shows a pop-up plot of the full uncertainty distribution associated with the highlighted printed value.You can toggle the "Automatically Show Plots" button ()
at the lower left of the stdout tab to instruct the Signaloid Cloud Developer Platform to show the distributional
plots automatically, without the need for hovering with your mouse over them. Figure 6 shows this option applied on the
the output of the Signaloid-Demo-General-C connected GitHub repository.
The Signaloid Cloud Development Platform enables you to set command-line arguments for your GitHub repository run via a dialog that opens by clicking the "Command Line Arguments" () button. The platform will pass the command-line arguments specified in the text area to your application when you run it.
The platform stores these command-line arguments and uses them in all follow-up executions of your GitHub repository. To reset the command-line arguments, click the "Command Line Arguments" () button again, remove your entries from the text area, and press the Set Arguments button.
The arguments are available to your application via the common arguments interface for your programming language. For
example, for Tasks written in C, the arguments are accessible in the argv array of length argc.
The Signaloid Cloud Compute Engine does not support quoting arguments that contain spaces to create a single argument.
In other words, if you set the command-line argument text area to arg1 "arg2p1 arg2p2", the compute engine will treat
"arg2p1 and arg2p2" as two separate arguments.
The "Mount Data Source" () button allows you to mount data sources that your application can access during its execution on a Signaloid C0 core. To mount a data source, first click on the "Mount Data Source" button. Figure 7 shows the "Mount Data Source" window which appears once you click on the "Mount Data Source" button. Clicking on "Select Data Source" allows you to select one of your available data sources.
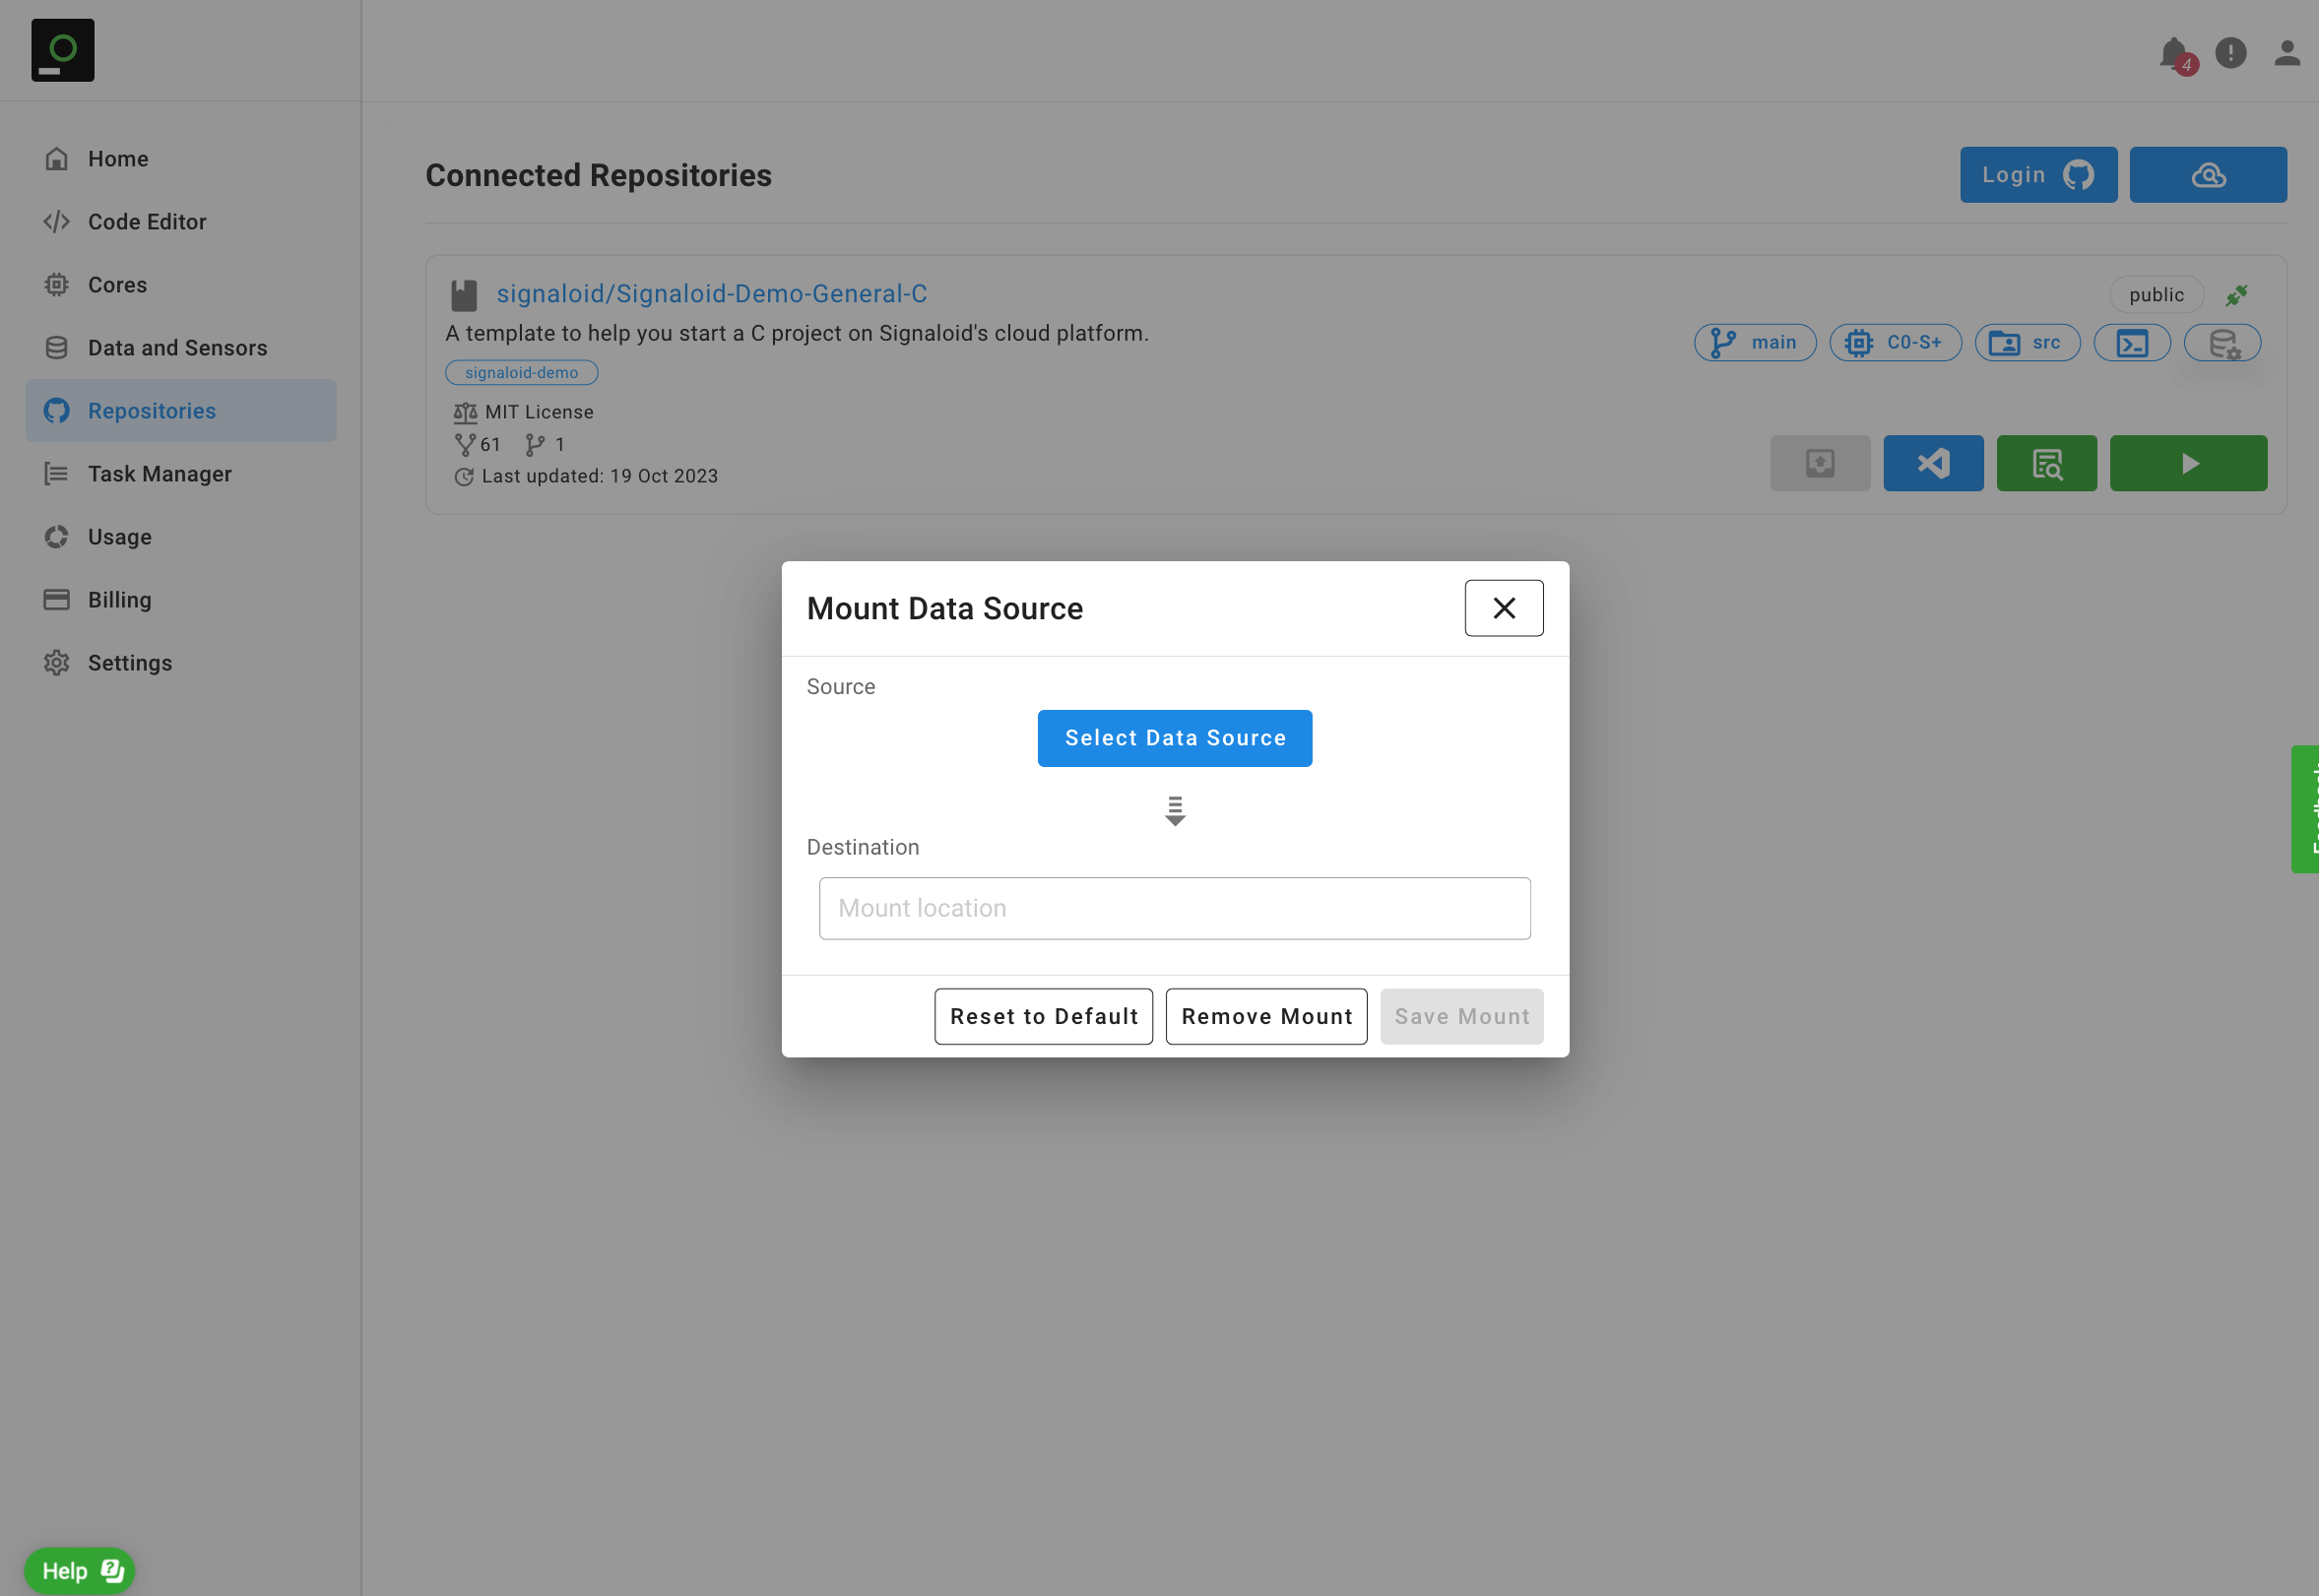
Figure 8 shows the modal dialog window that appears when you click on the "Select Data Source" button. Click on the "Mount Data Source" () button to select a data source. In the example of Figure 8 we select the Signaloid Cloud Storage, which is available to all Signaloid user accounts.

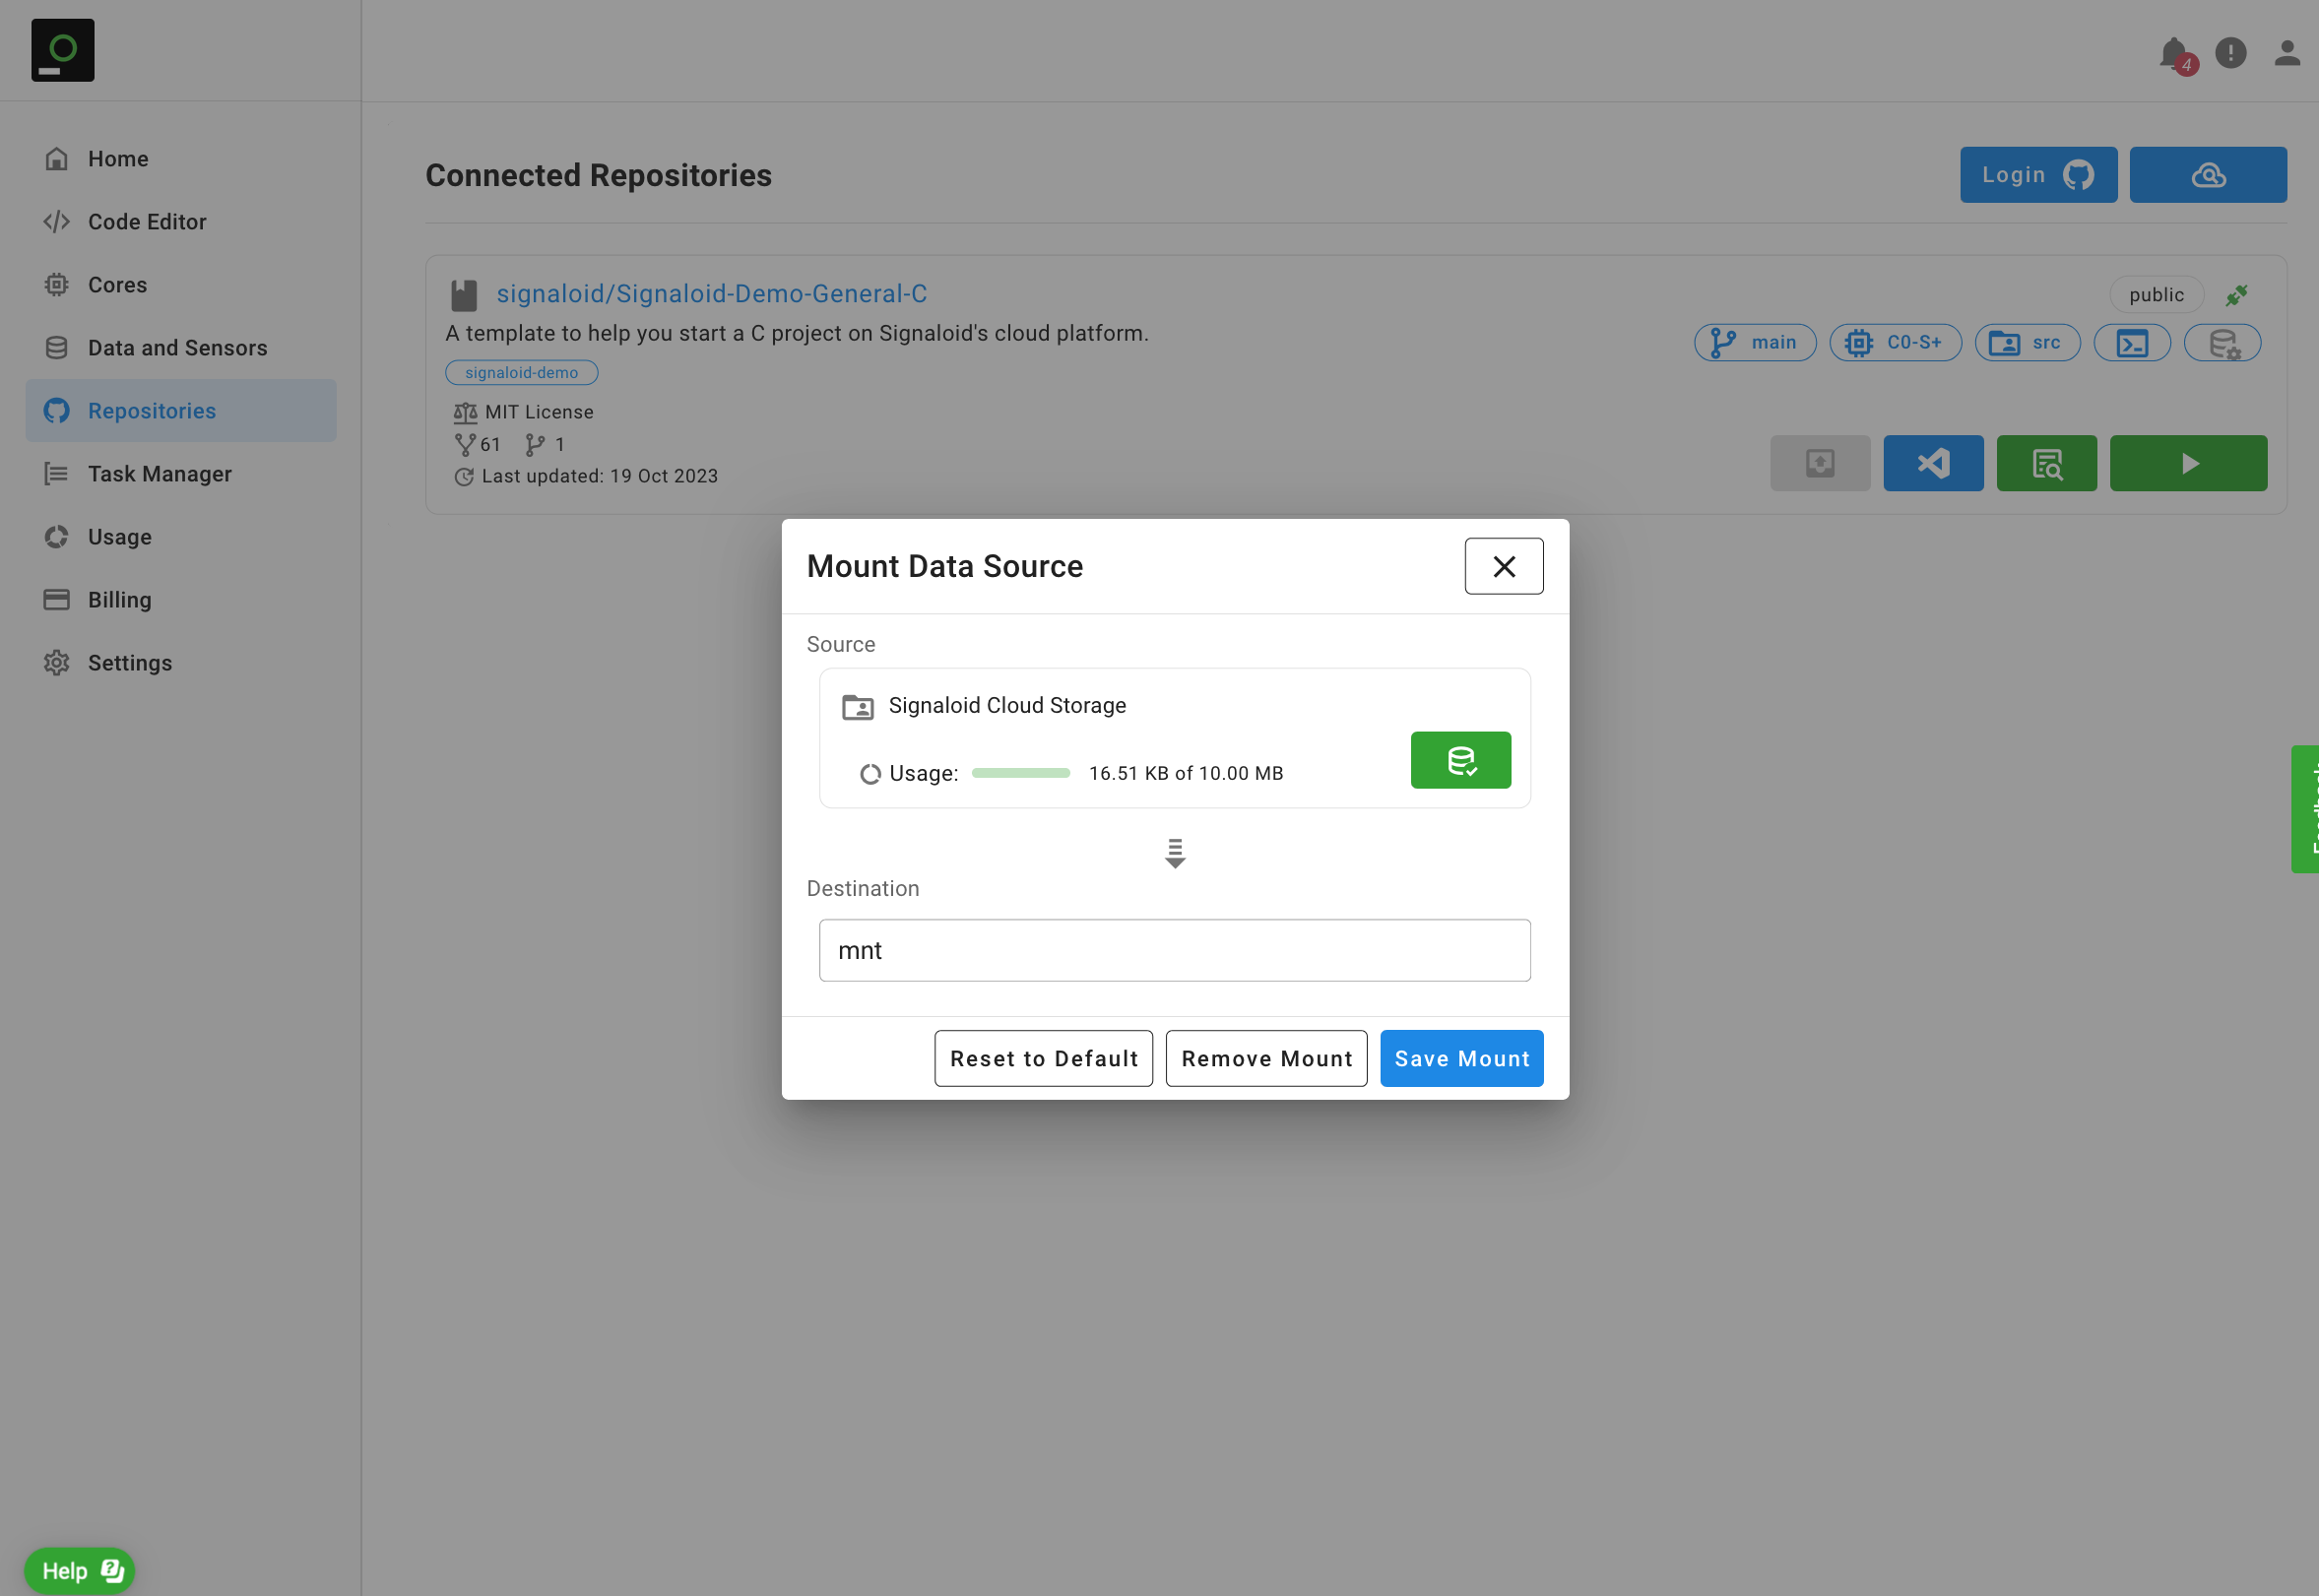
Selecting a data source takes you back to the Mount Data Source window. Then, enter the mount location destination
of your selected data source, which is the root path for your application to access your data source. Figure 9 shows
an example setting of the mount point to mnt. You need to click on the "Save Mount" button to complete
the mounting process. Your connected repository can then read and write to files in your Signaloid Cloud Data Storage
by accessing them in under the mnt directory, e.g., FILE * fp = fopen("mnt/myNewFile.csv", "w").
The Signaloid Cloud Developer Platform highlights a complete mount by making the "Mount Data Source" icon orange.
In the "Mount Data Source" window, clicking on the "Reset to Default" button will mount your default mount configuration as defined in the Settings page.
Clicking on the "Remove Mount" button will unmount any mounted data sources for you application.
You can commit read-only inputs in a top-level inputs directory of you GitHub repository. You can access these read-only files from your GitHub
repository assuming that your code is running inside the inputs directory. For example, if you have an inputs/input.csv in your connected GitHub
repository, you can access it from your source code using FILE * fp = fopen("input.csv", "r").