Connect Data Sources to Applications
Learn how to connect to external data sources and sensor data streams to your applications.
The Data Sources feature of the Signaloid Cloud Developer Platform allows you to connect external data streams to your applications, allowing them to read from and write to resources outside the Signaloid Cloud Compute Engine.
Many applications rely on data from external sources to run correctly; e.g., live data streams from sensors in a factory or access process calibration parameters stored in cloud storage. Often applications also want to be able to send the outputs of their computations to external destinations, for example, a blob storage like AWS S3.
The Data Sources feature of the Signaloid Cloud Developer Platform provides you with a way to connect such external data sources to your applications when they run on the Signaloid Cloud Compute Engine. You can manage the data sources connected to your account from the Data and Sensors page. You can connect to a variety of data sources, including sensor data streams and AWS S3 buckets.
Your Signaloid Cloud account also gives you access to the Signaloid Cloud Storage. This guide will use the Signaloid Cloud Storage to show you how to write applications that read from and write to data sources.
The Signaloid Cloud Storage is a personal cloud storage space attached to your Signaloid Cloud account that you can use to easily store data related to your applications.
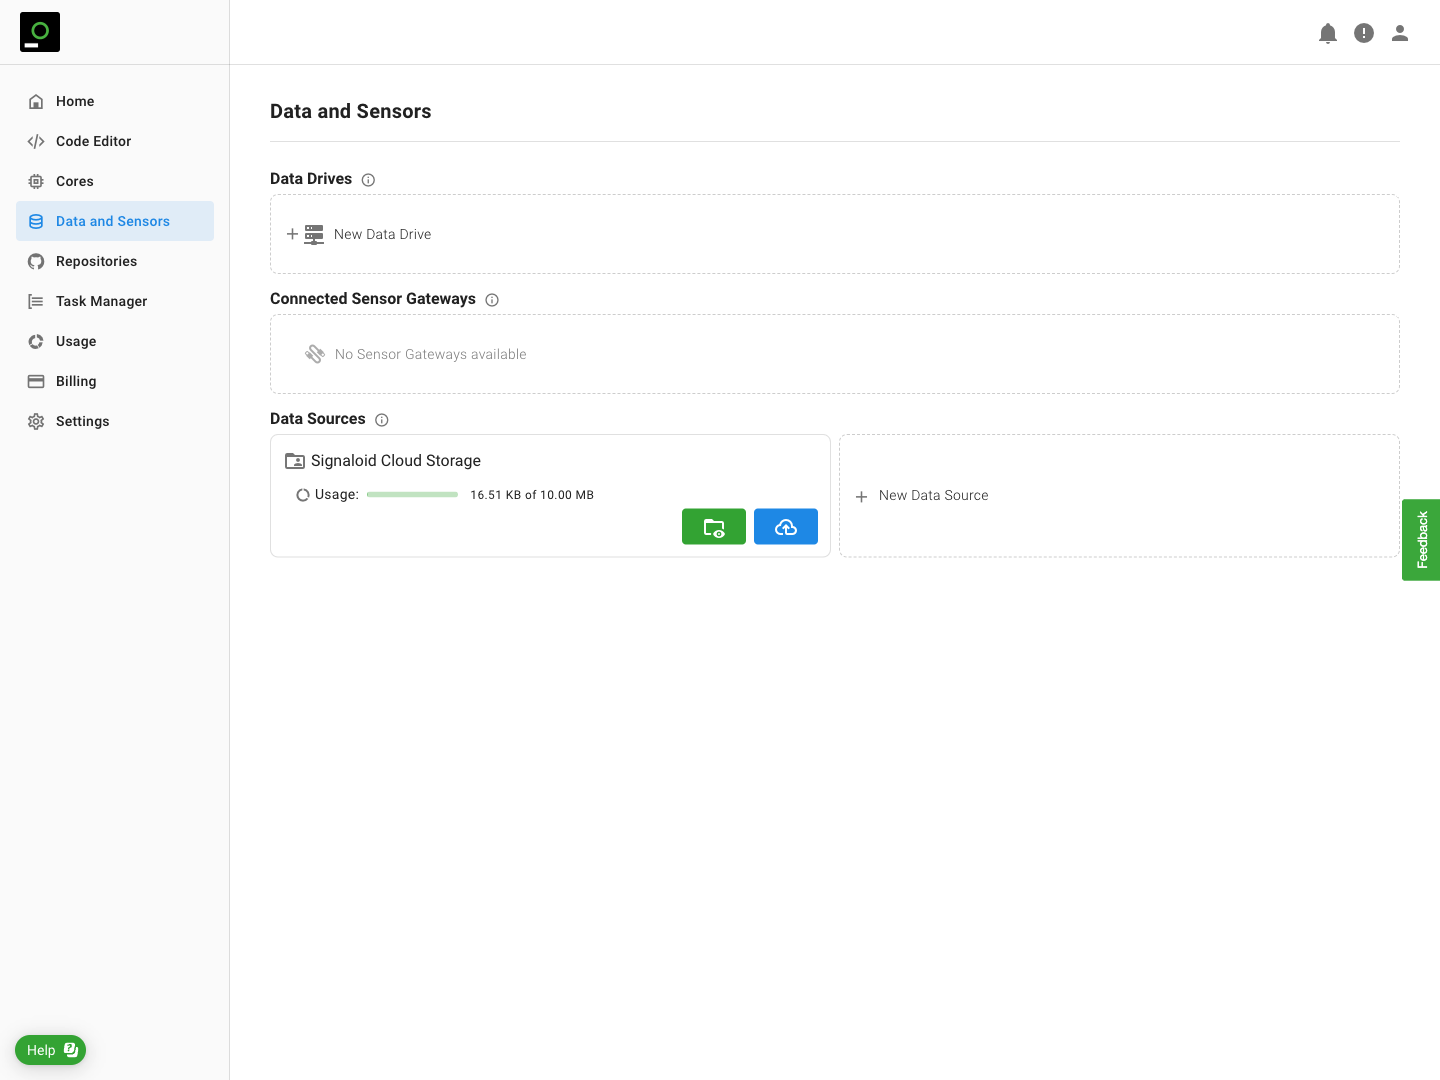
The Data and Sensors page
The Data and Sensors page of the Signaloid Cloud Developer Platform is your portal for managing data sources connected to your Signaloid Cloud account, and for connecting new data sources. You can access the Data and Sensors page using the "Data and Sensors" () button on the navigation panel or by going to signaloid.io/datasources. In the Data and Sensors page you can find three main sections:
- Data Drives: They are collections of data sources with associated mount points. They allow you to mount multiple data sources for the same execution so that applications running on the Signaloid Cloud Compute Engine can access their data.
- Signaloid Sensor Gateways: Sensor Gateways provided on demand by Signaloid. They connect to different sensor modules and stream data from them to AWS S3 buckets. Signaloid Sensor Gateway connected to your account will appear here once you set them up.
- Data Sources: Individual data sources that your Signaloid account and applications running on Signaloid C0 cores can access to read and write data. The default data source is the Signaloid Cloud Storage and you can create additional data sources by connecting AWS S3 buckets.
Upload and download files from the Signaloid Cloud Storage
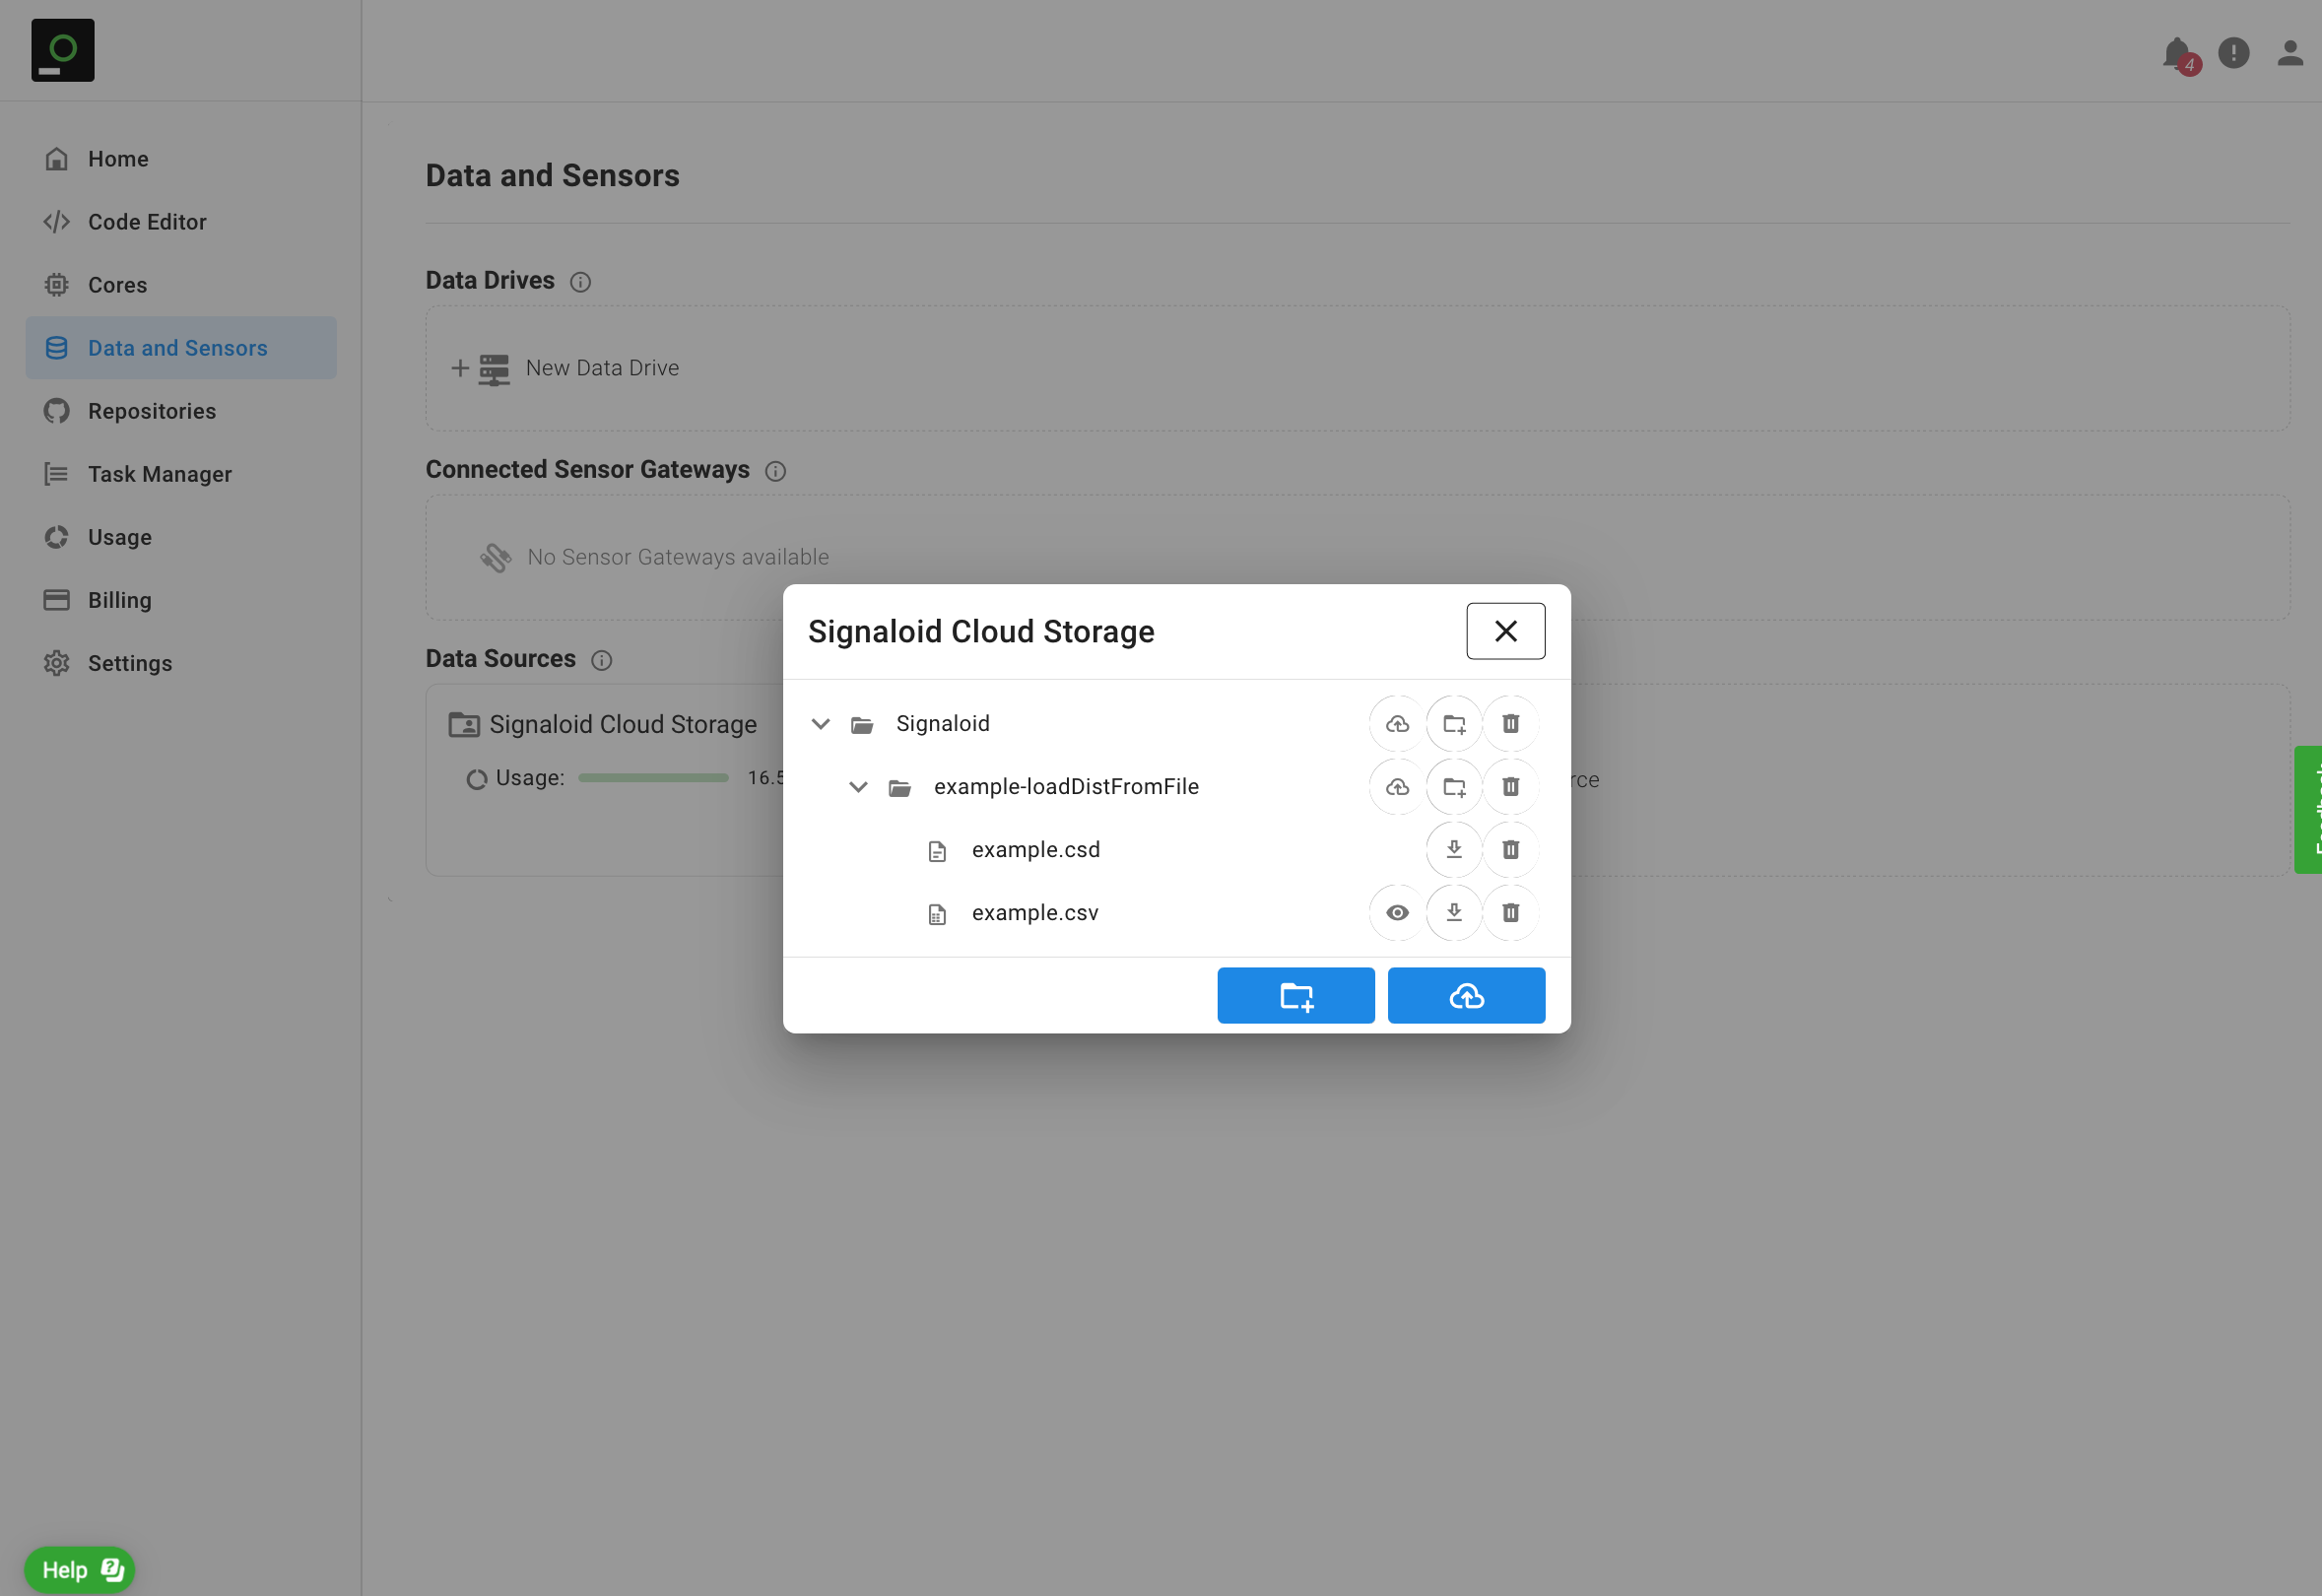
You can explore the files in the Cloud storage by clicking the "View Files" () button on the Signaloid Cloud Storage card in the Data and Sensors page.
Figure 2 shows the default contents of the Signaloid Cloud Storage. Use the icons in the directories list to expand the directories and navigate to Signaloid/example-loadDistFromFile/. You can then download the example.csd file to your computer by clicking the download () button. You can view the contents of text files like example.csv using the "View File" () button. You can upload files to the Signaloid Cloud Storage using the "Upload Files" () button. You can create a new directory using the "Create Directory" () button. You can delete a file or a folder using the "Delete" () button.
Accessing a Data Source from an application running on Signaloid C0 cores
Your applications can access and create files in one or more of your Data Sources during their execution on the Signaloid Cloud Compute Engine. Similar to a server or personal computer you need to have your Data Source mounted so that applications can access it. See the Code Editor reference section for details of how to mount a Data Source for an application running from the Code Editor. See the connected GitHub Repositories reference for details of how to mount a Data Source when you run one of your connected GitHub repositories on one of the Signaloid C0 cores.
For both a Code Editor or a connected GitHub Repository run, to access a Data Source you need to have mounted it in a mount location of your choice. The mount location is the start of the absolute path that your applications running on Signaloid C0 cores should reference to read or write to files in your mounted Data Source. For example, if your chosen mount location is mountDir, you can create a new file myNewFile.txt for writing using the call fopen("mountDir/myNewFile.txt", "w") in the C programming language.
Understand how the default code example works
The default code example of the Signaloid Cloud Developer Platform is shown in the code snippet below.
#include <stdio.h>
#include <stdlib.h>

void loadDataFromFile(double * a, double * b);

int
main(int argc, char *  argv[])
{
	double	a, b, c;

	loadDataFromFile(&a, &b);
	printf("a = %lf\n", a);
	printf("b = %lf\n", b);

	c = (a+b)/(a-b);
	printf("c = %lf\n", c);

	return 0;
}

void
loadDataFromFile(double * a, double * b)
{
	FILE *  fp;

	fp = fopen("sd0/Signaloid/example-loadDistFromFile/example.csd", "r");
	if (fp == NULL)
	{
		fprintf(stderr, "Could not open sd0/Signaloid/example-loadDistFromFile/example.csd.\n");

		exit(EXIT_FAILURE);
	}

	fscanf(fp, "%lf, %lf\n", a, b);
}
Do you understand how it works? Can you identify the lines responsible for reading values from a file?
This program uses the loadDataFromFile function for handling file I/O. This function first reads a file called example.csd using the standard C function fopen (line 26). It then loads the values in this file into the two variables a, and b using the fscanf function (line 34).
#include <stdio.h>
#include <stdlib.h>

void loadDataFromFile(double * a, double * b);

int
main(int argc, char *  argv[])
{
	double	a, b, c;

	loadDataFromFile(&a, &b);
	printf("a = %lf\n", a);
	printf("b = %lf\n", b);

	c = (a+b)/(a-b);
	printf("c = %lf\n", c);

	return 0;
}

void
loadDataFromFile(double * a, double * b)
{
	FILE *  fp;

	fp = fopen("sd0/Signaloid/example-loadDistFromFile/example.csd", "r");
	if (fp == NULL)
	{
		fprintf(stderr, "Could not open sd0/Signaloid/example-loadDistFromFile/example.csd.\n");

		exit(EXIT_FAILURE);
	}

	fscanf(fp, "%lf, %lf\n", a, b);
}
Can you figure out how the Signaloid Cloud storage should be mounted for this application to work correctly?
The program expects the data file to be available at sd0/Signaloid/example-loadDistFromFile/example.csd . However, if you look at the file structure of the Signaloid cloud storage, you will see that Signaloid is a top level directory. This means that if Signaloid cloud storage is mounted under the sd0 path, the file path will match the file path the program expects.
Adding a new Data Source
You can add a new Data Source using the "New Data Source" () button. Figure 3 shows the drop-down list of available Data sources in the "Add a Data Source" modal window. You can choose the "S3 Bucket" from the drop-down list to connect an AWS S3 bucket.
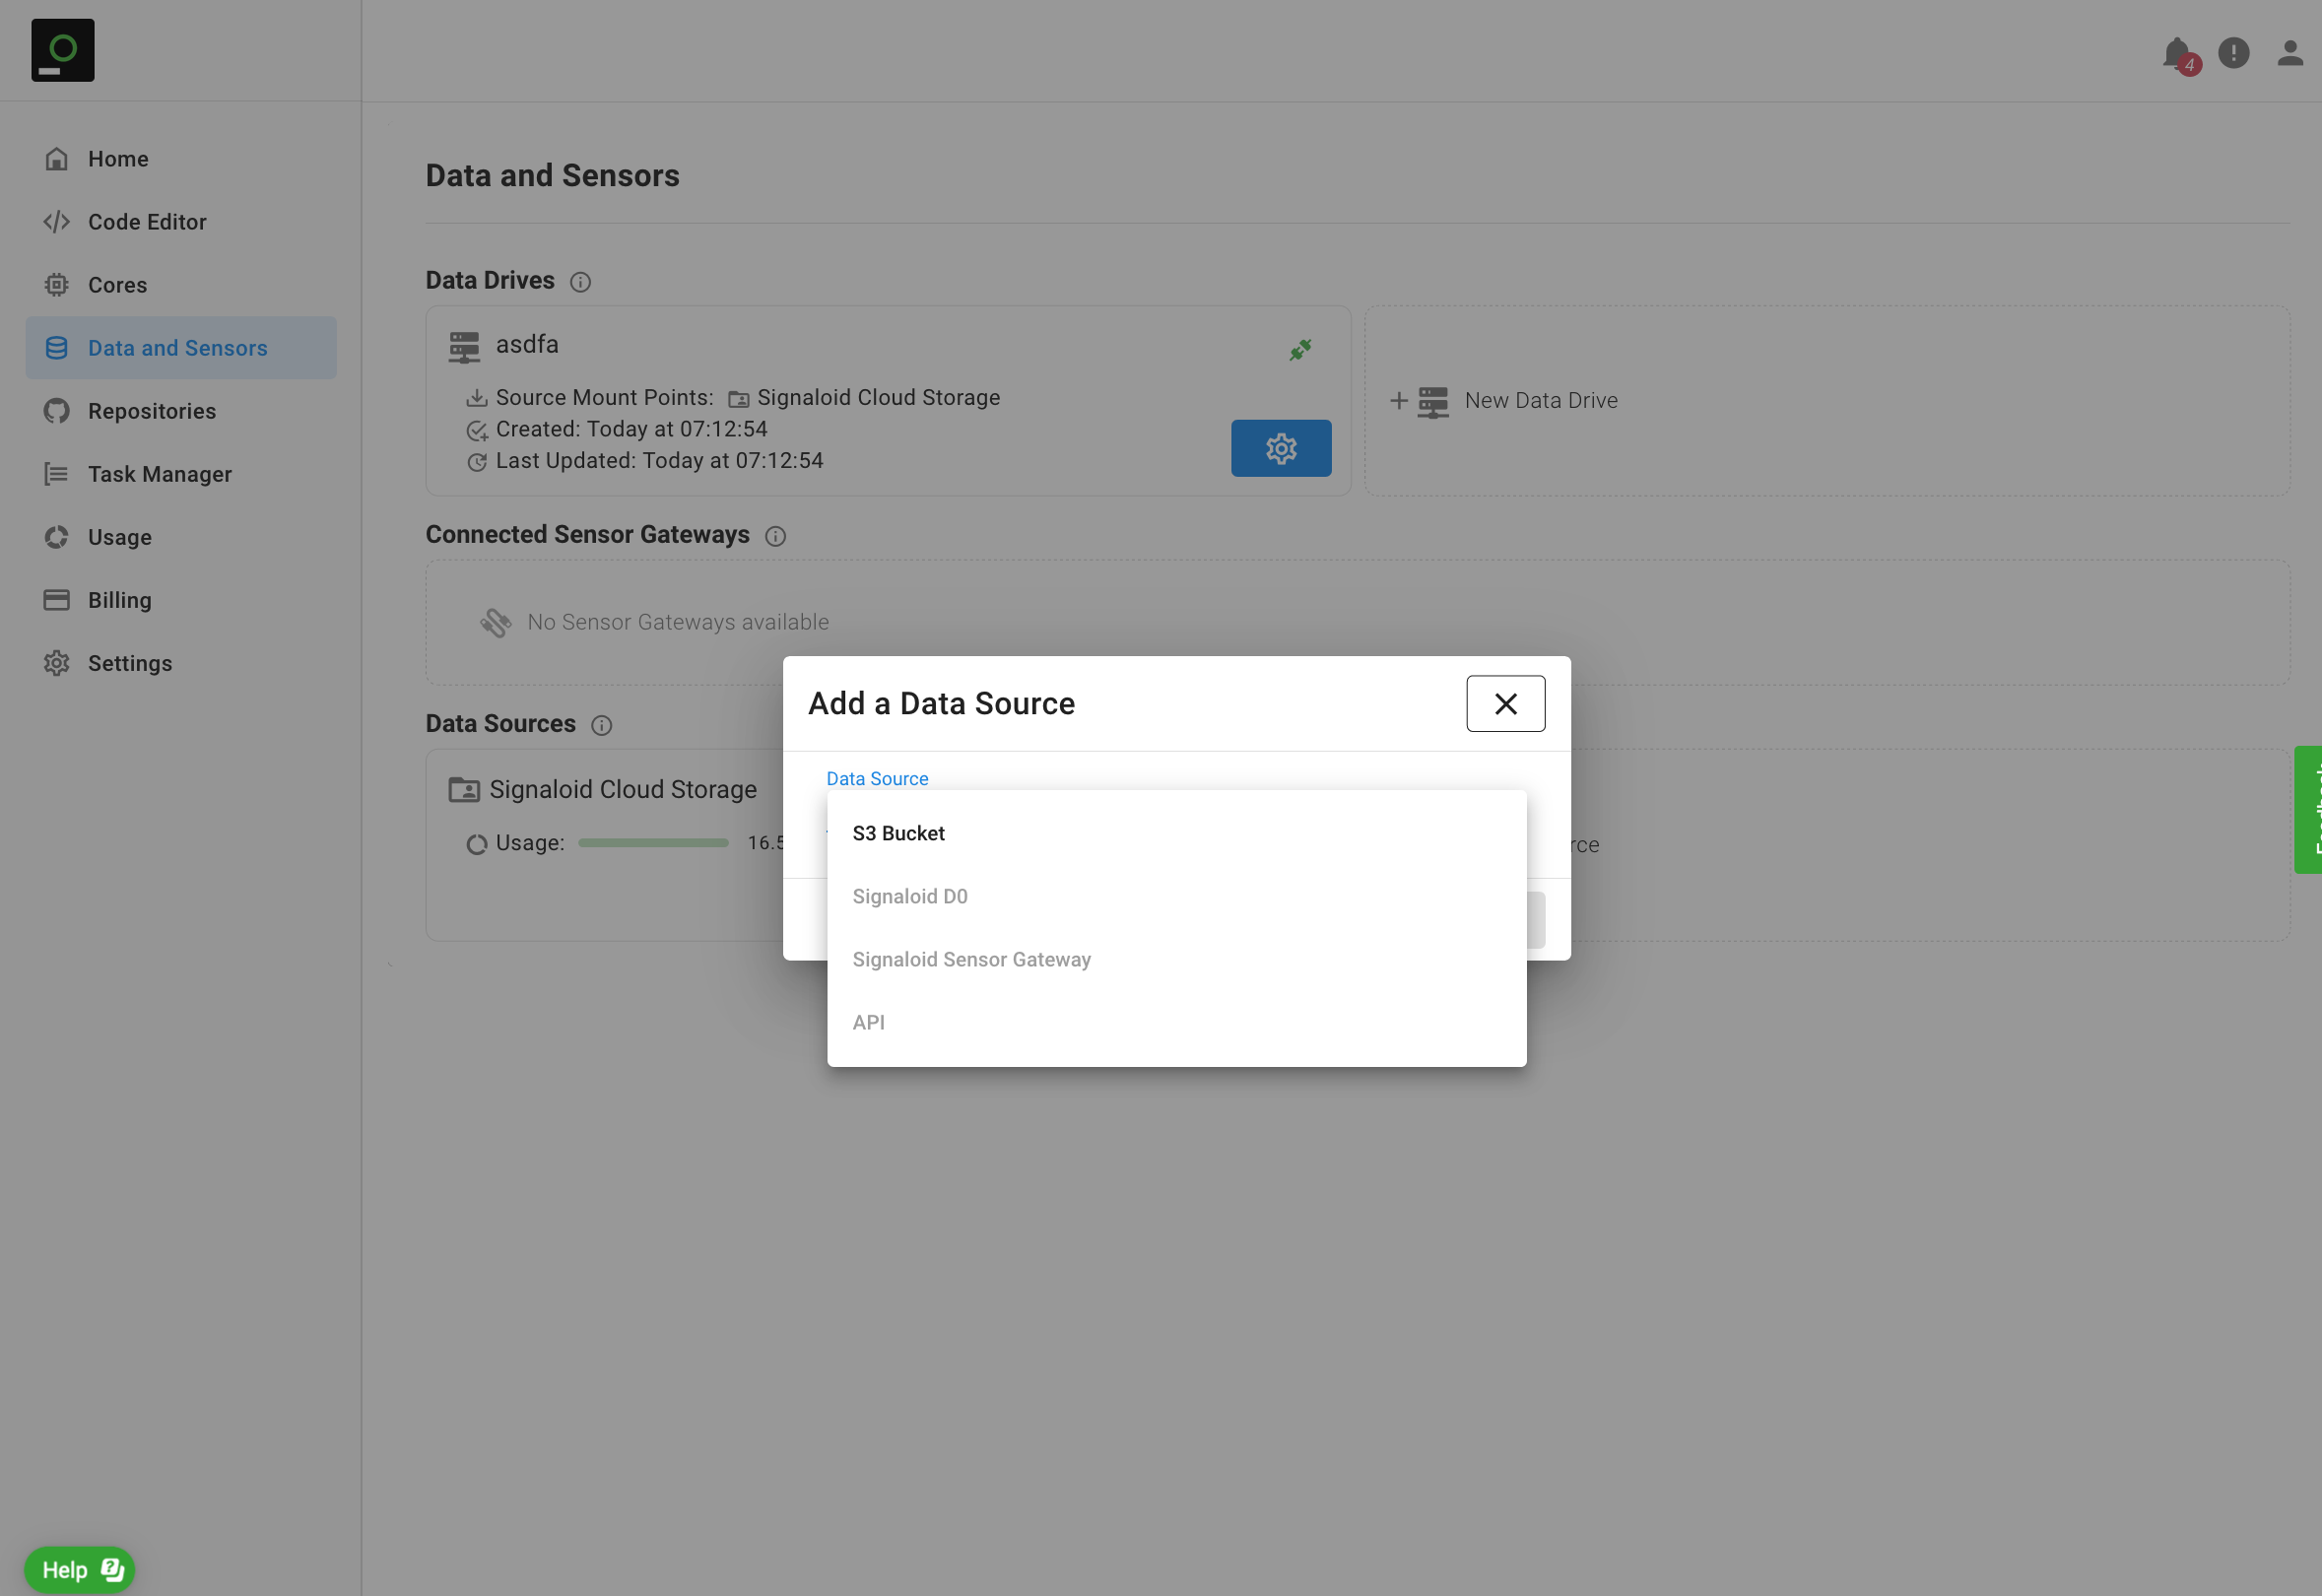
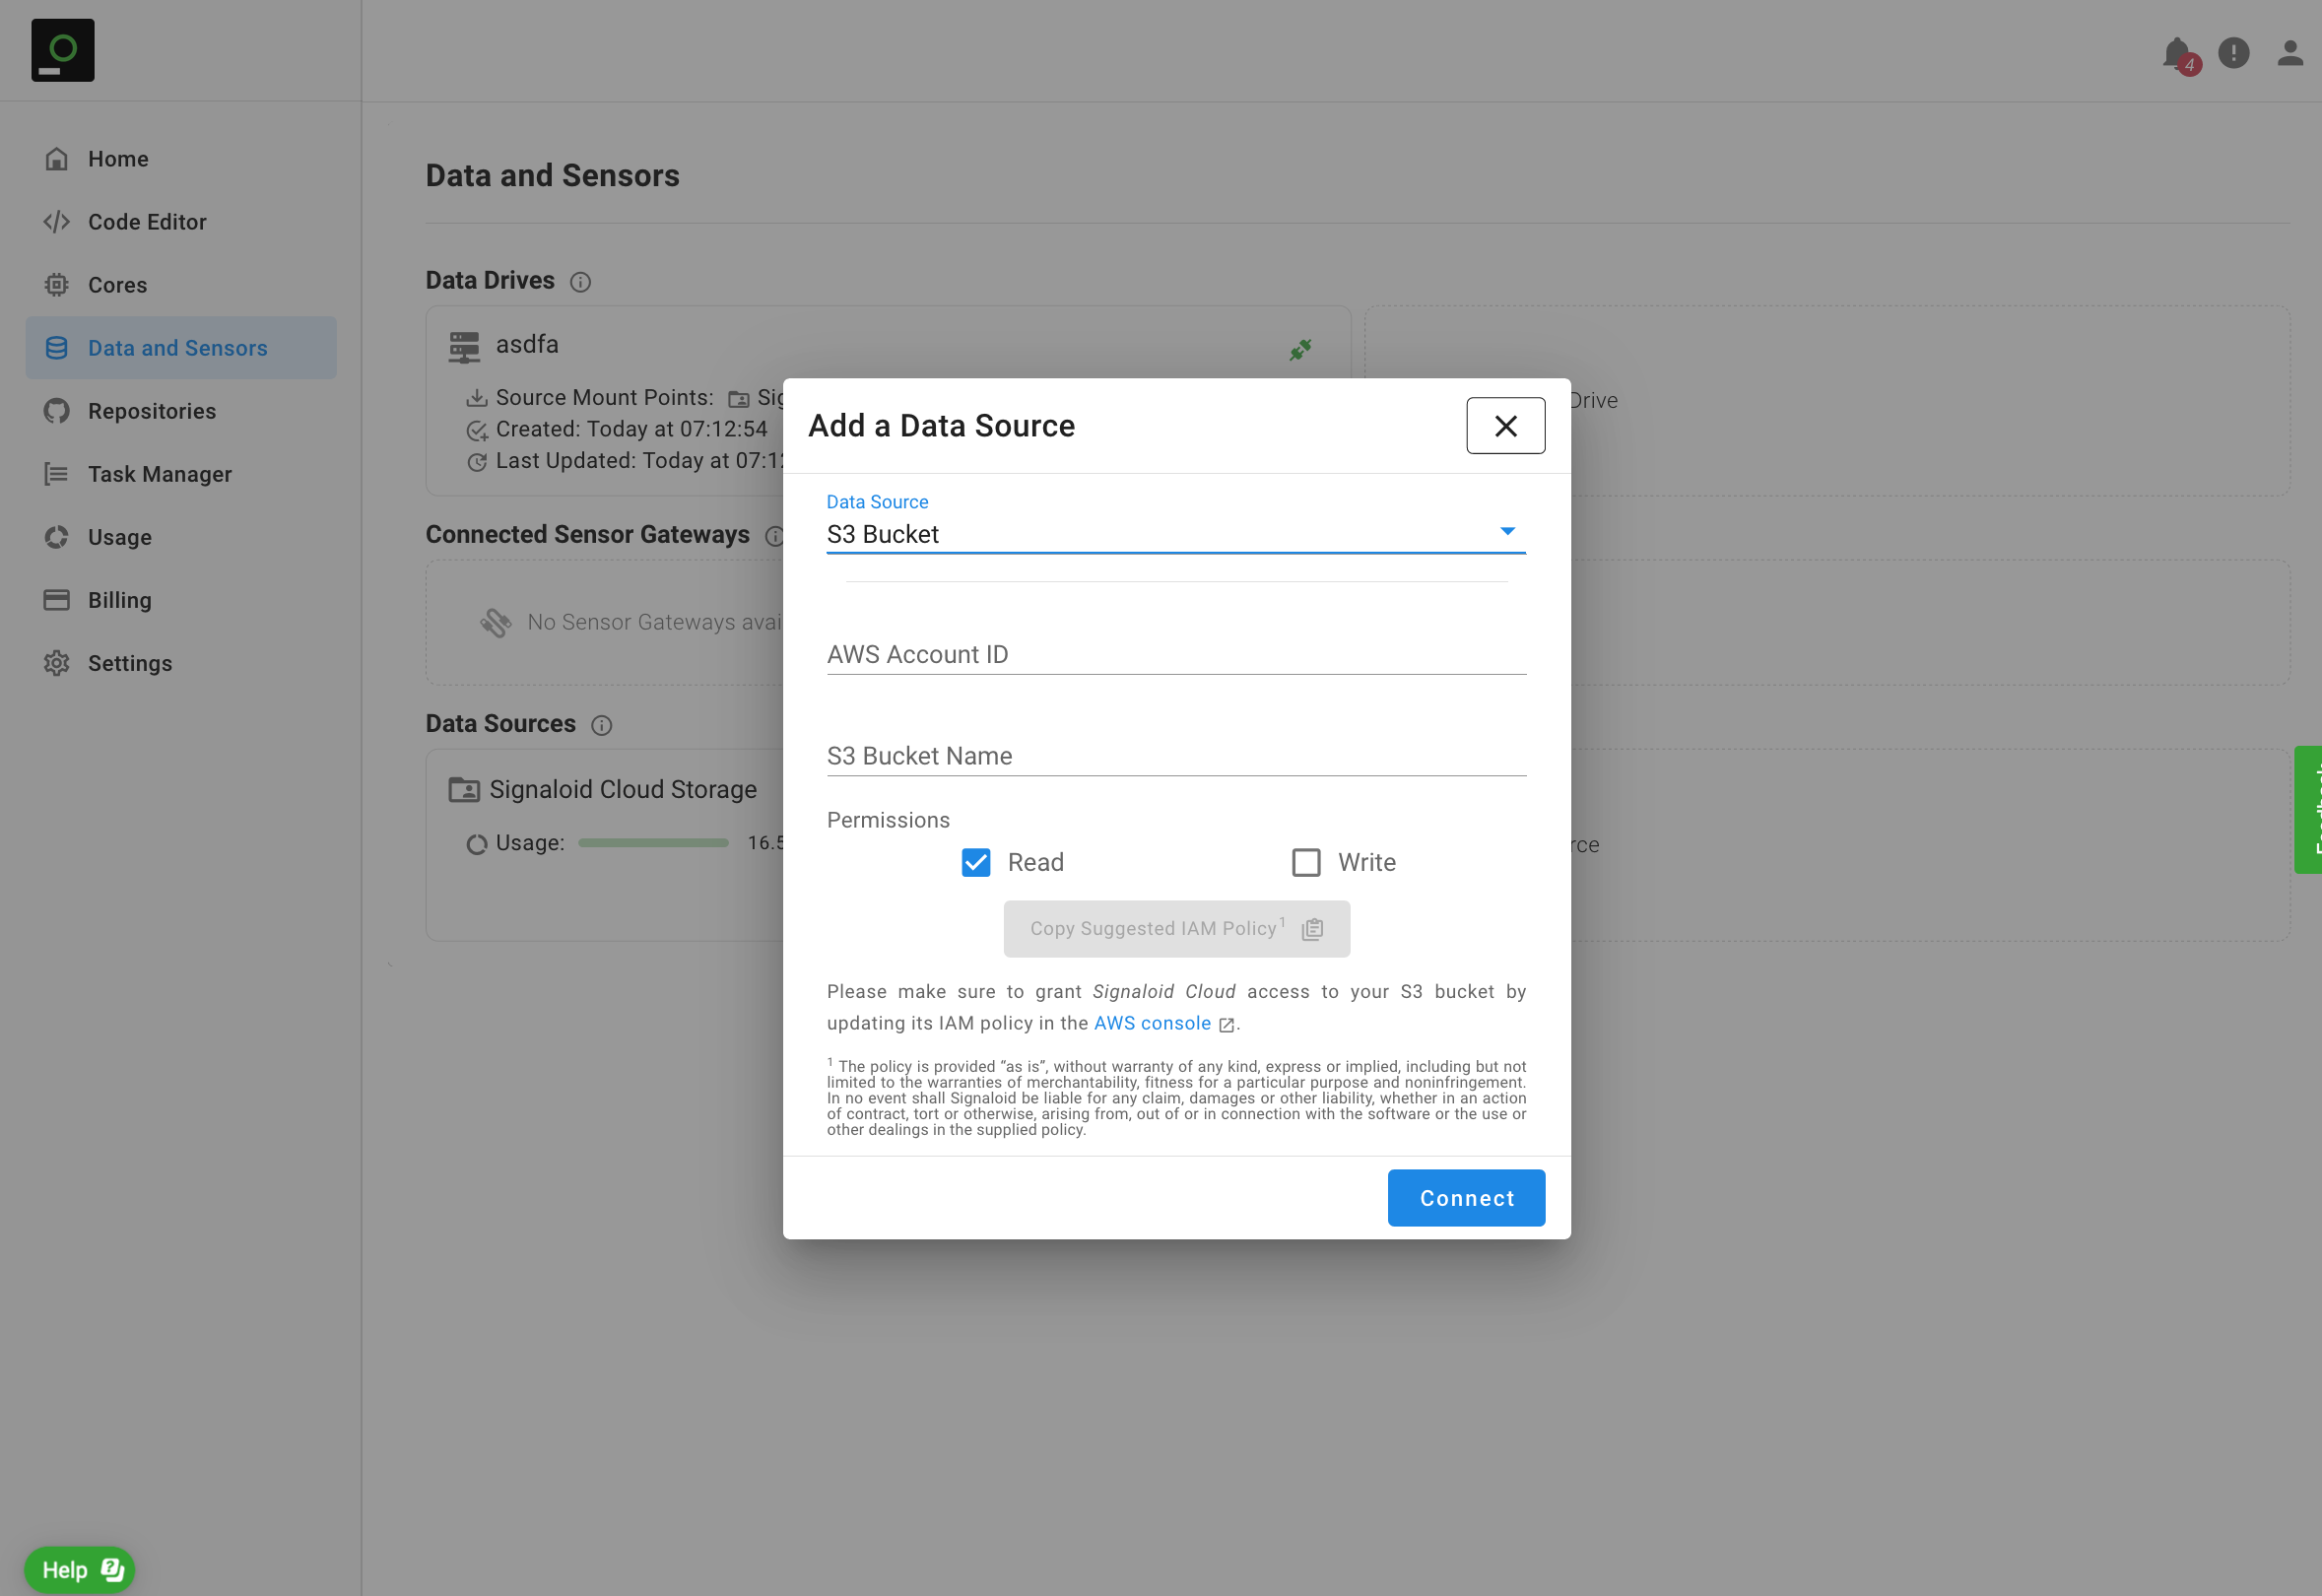
Figure 4 shows the modal window for connecting an AWS S3 bucket. You need to enter your 12-digit AWS Account ID and your S3 bucket name. You can choose the read and writing permissions for your AWS S3 bucket. Clicking on the "Copy Suggested IAM Policy" () button will generate and copy in JSON format the policy that you need to apply to your AWS S3 bucket to allow the Signaloid AWS account to access it.
Managing Data Drives
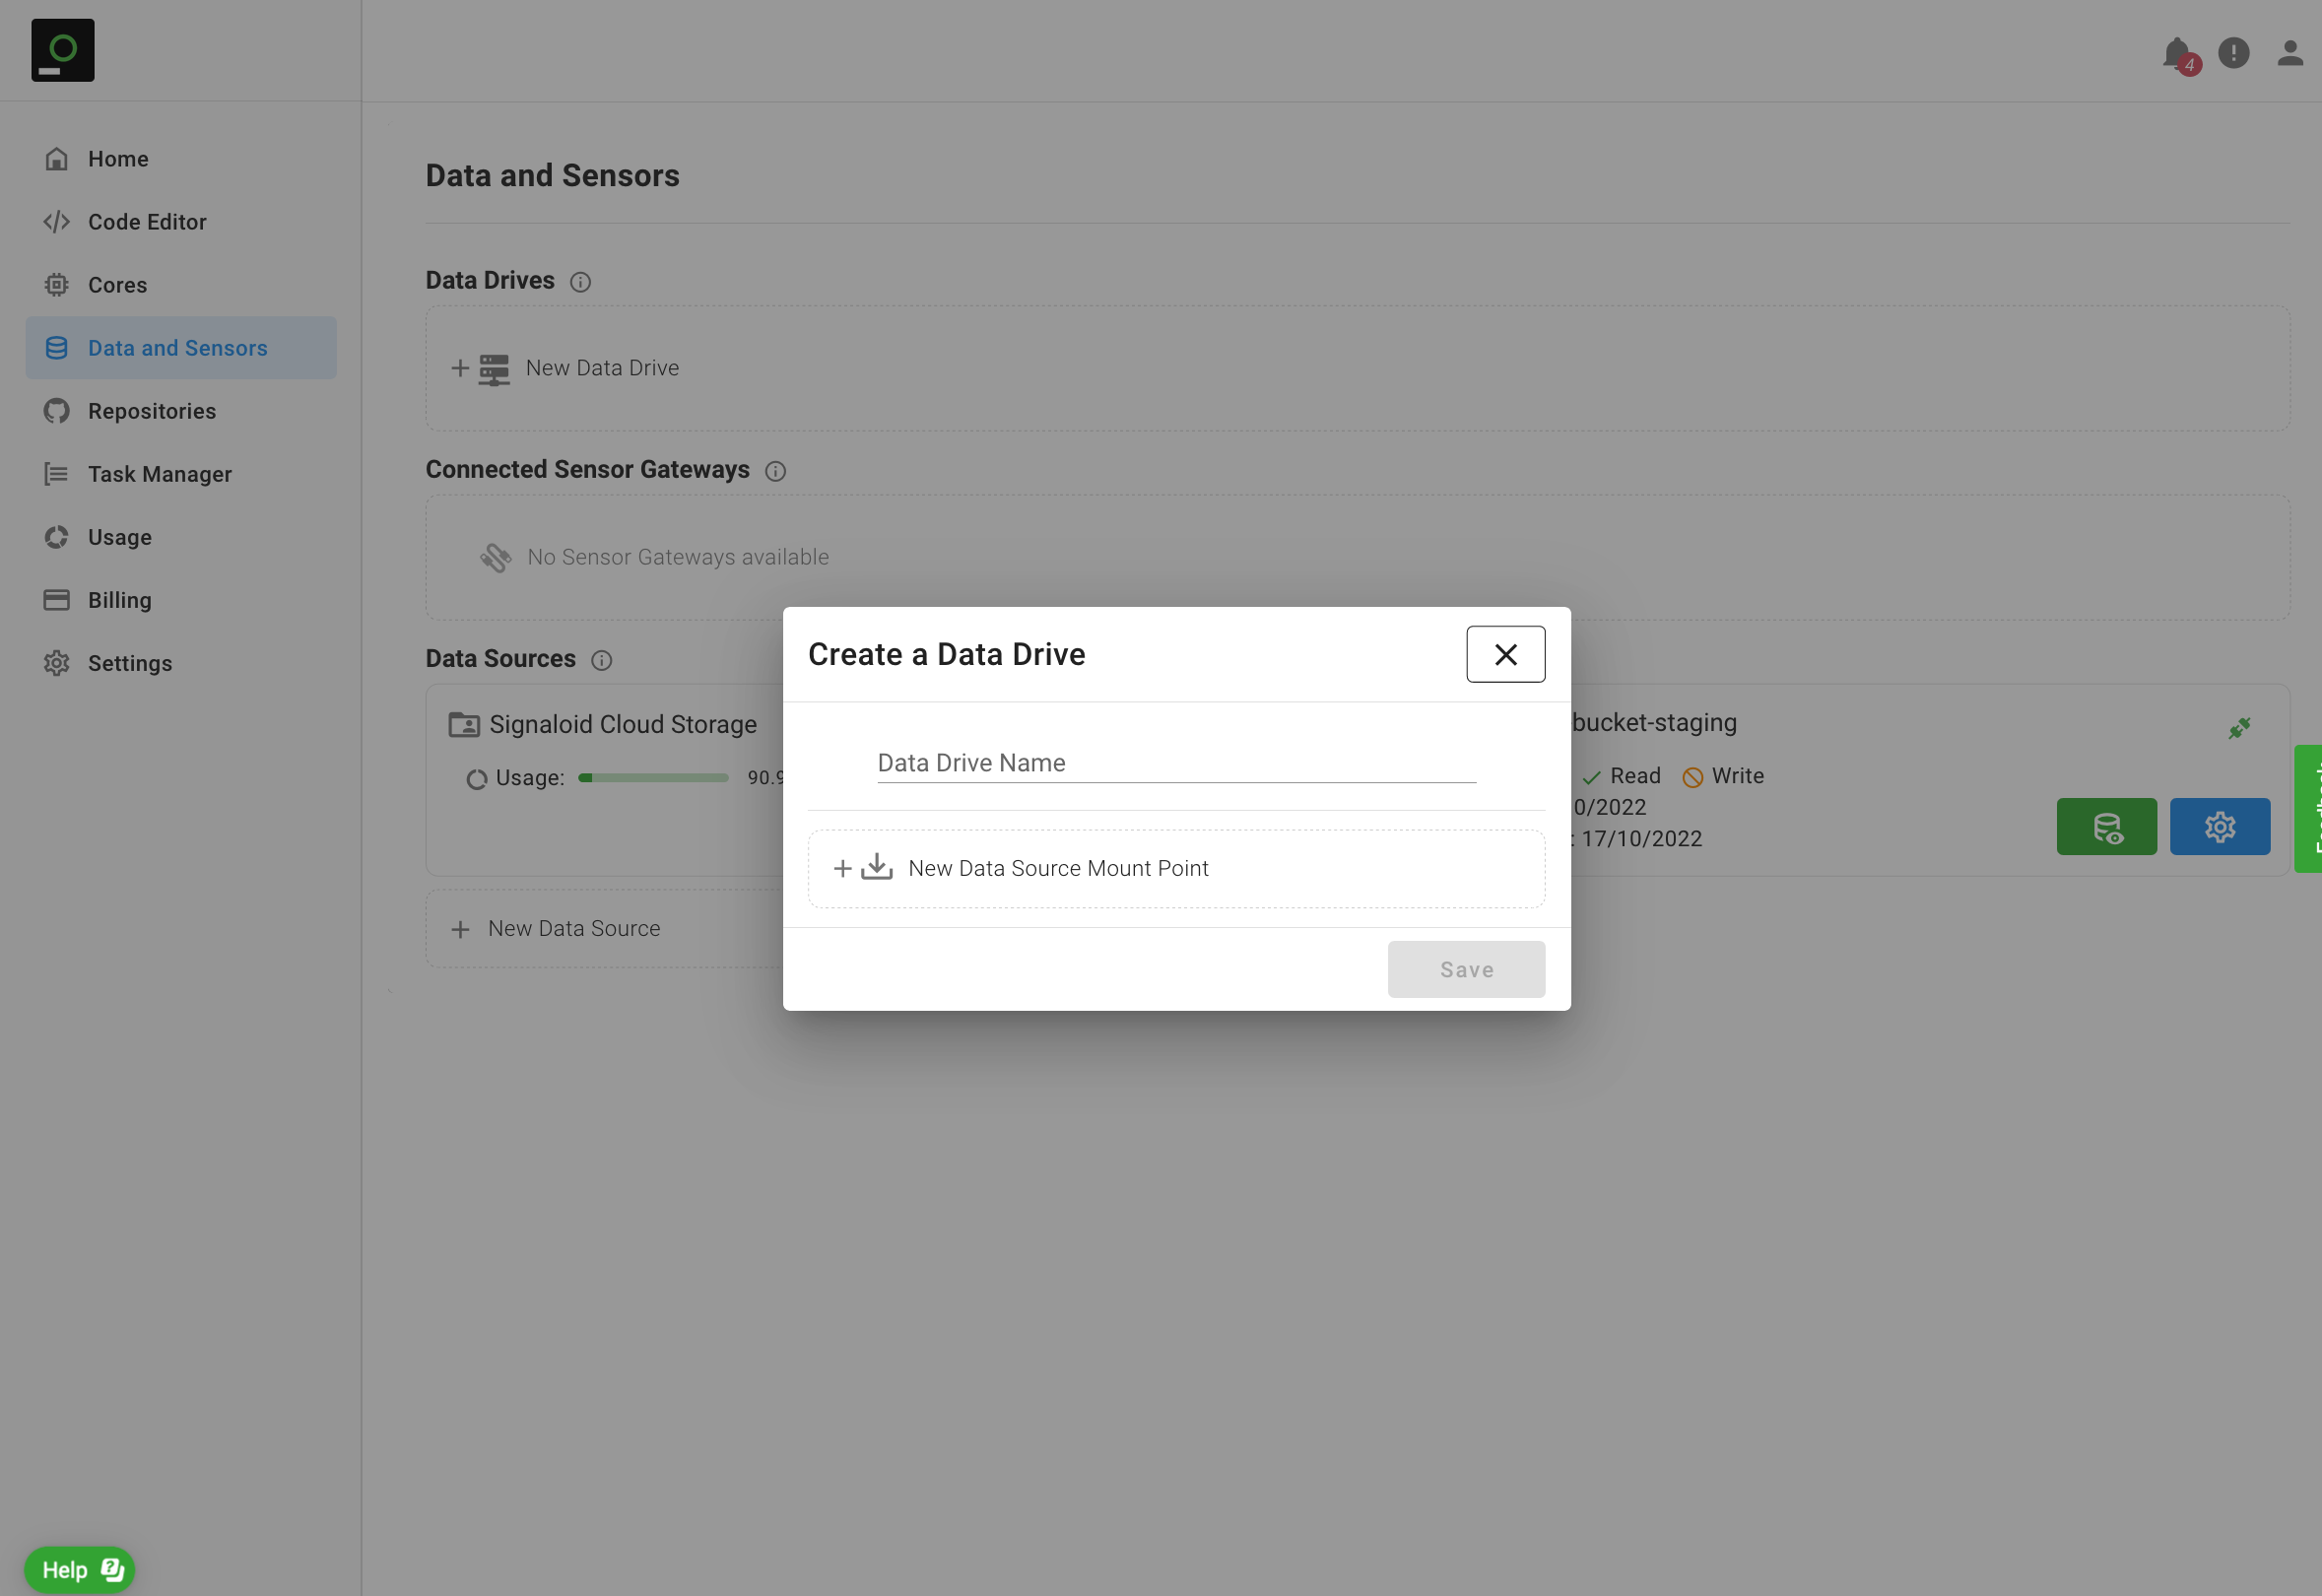
Data Drives are collections of Data sources and associated mount configurations which will allow you to easily connect multiple data sources to your applications in a repeatable way. From the Data and Sources page you can add a new data drive by clicking the "New Data Drive" () button. Figure 5 shows the pop-up modal window for adding a new data drive. You need to give a distinct name to your new Data Drive and specify the Data Sources that Data Drive will include. You can achieve this using the "New Data Source Mount Point" () button.
Clicking on the "New Data Source Mount Point" () button takes you to an form where you need to select one of your available Data Sources and set a mount location for it. You need to repeat the addition for all the Data Sources that you want your new Data Drive to include. Figure 6 shows a new Data Drive with the name myNewDrive that includes two Data Sources, i.e., the Signaloid Cloud Data Storage mounted at the mountStorage mount point and an additional AWS S3 bucket mounted at mountAWSBucket. Both these mount location are relative to the eventual mount location of the Data Drive. You need to click on the "Save" button to create the new Data Drive.
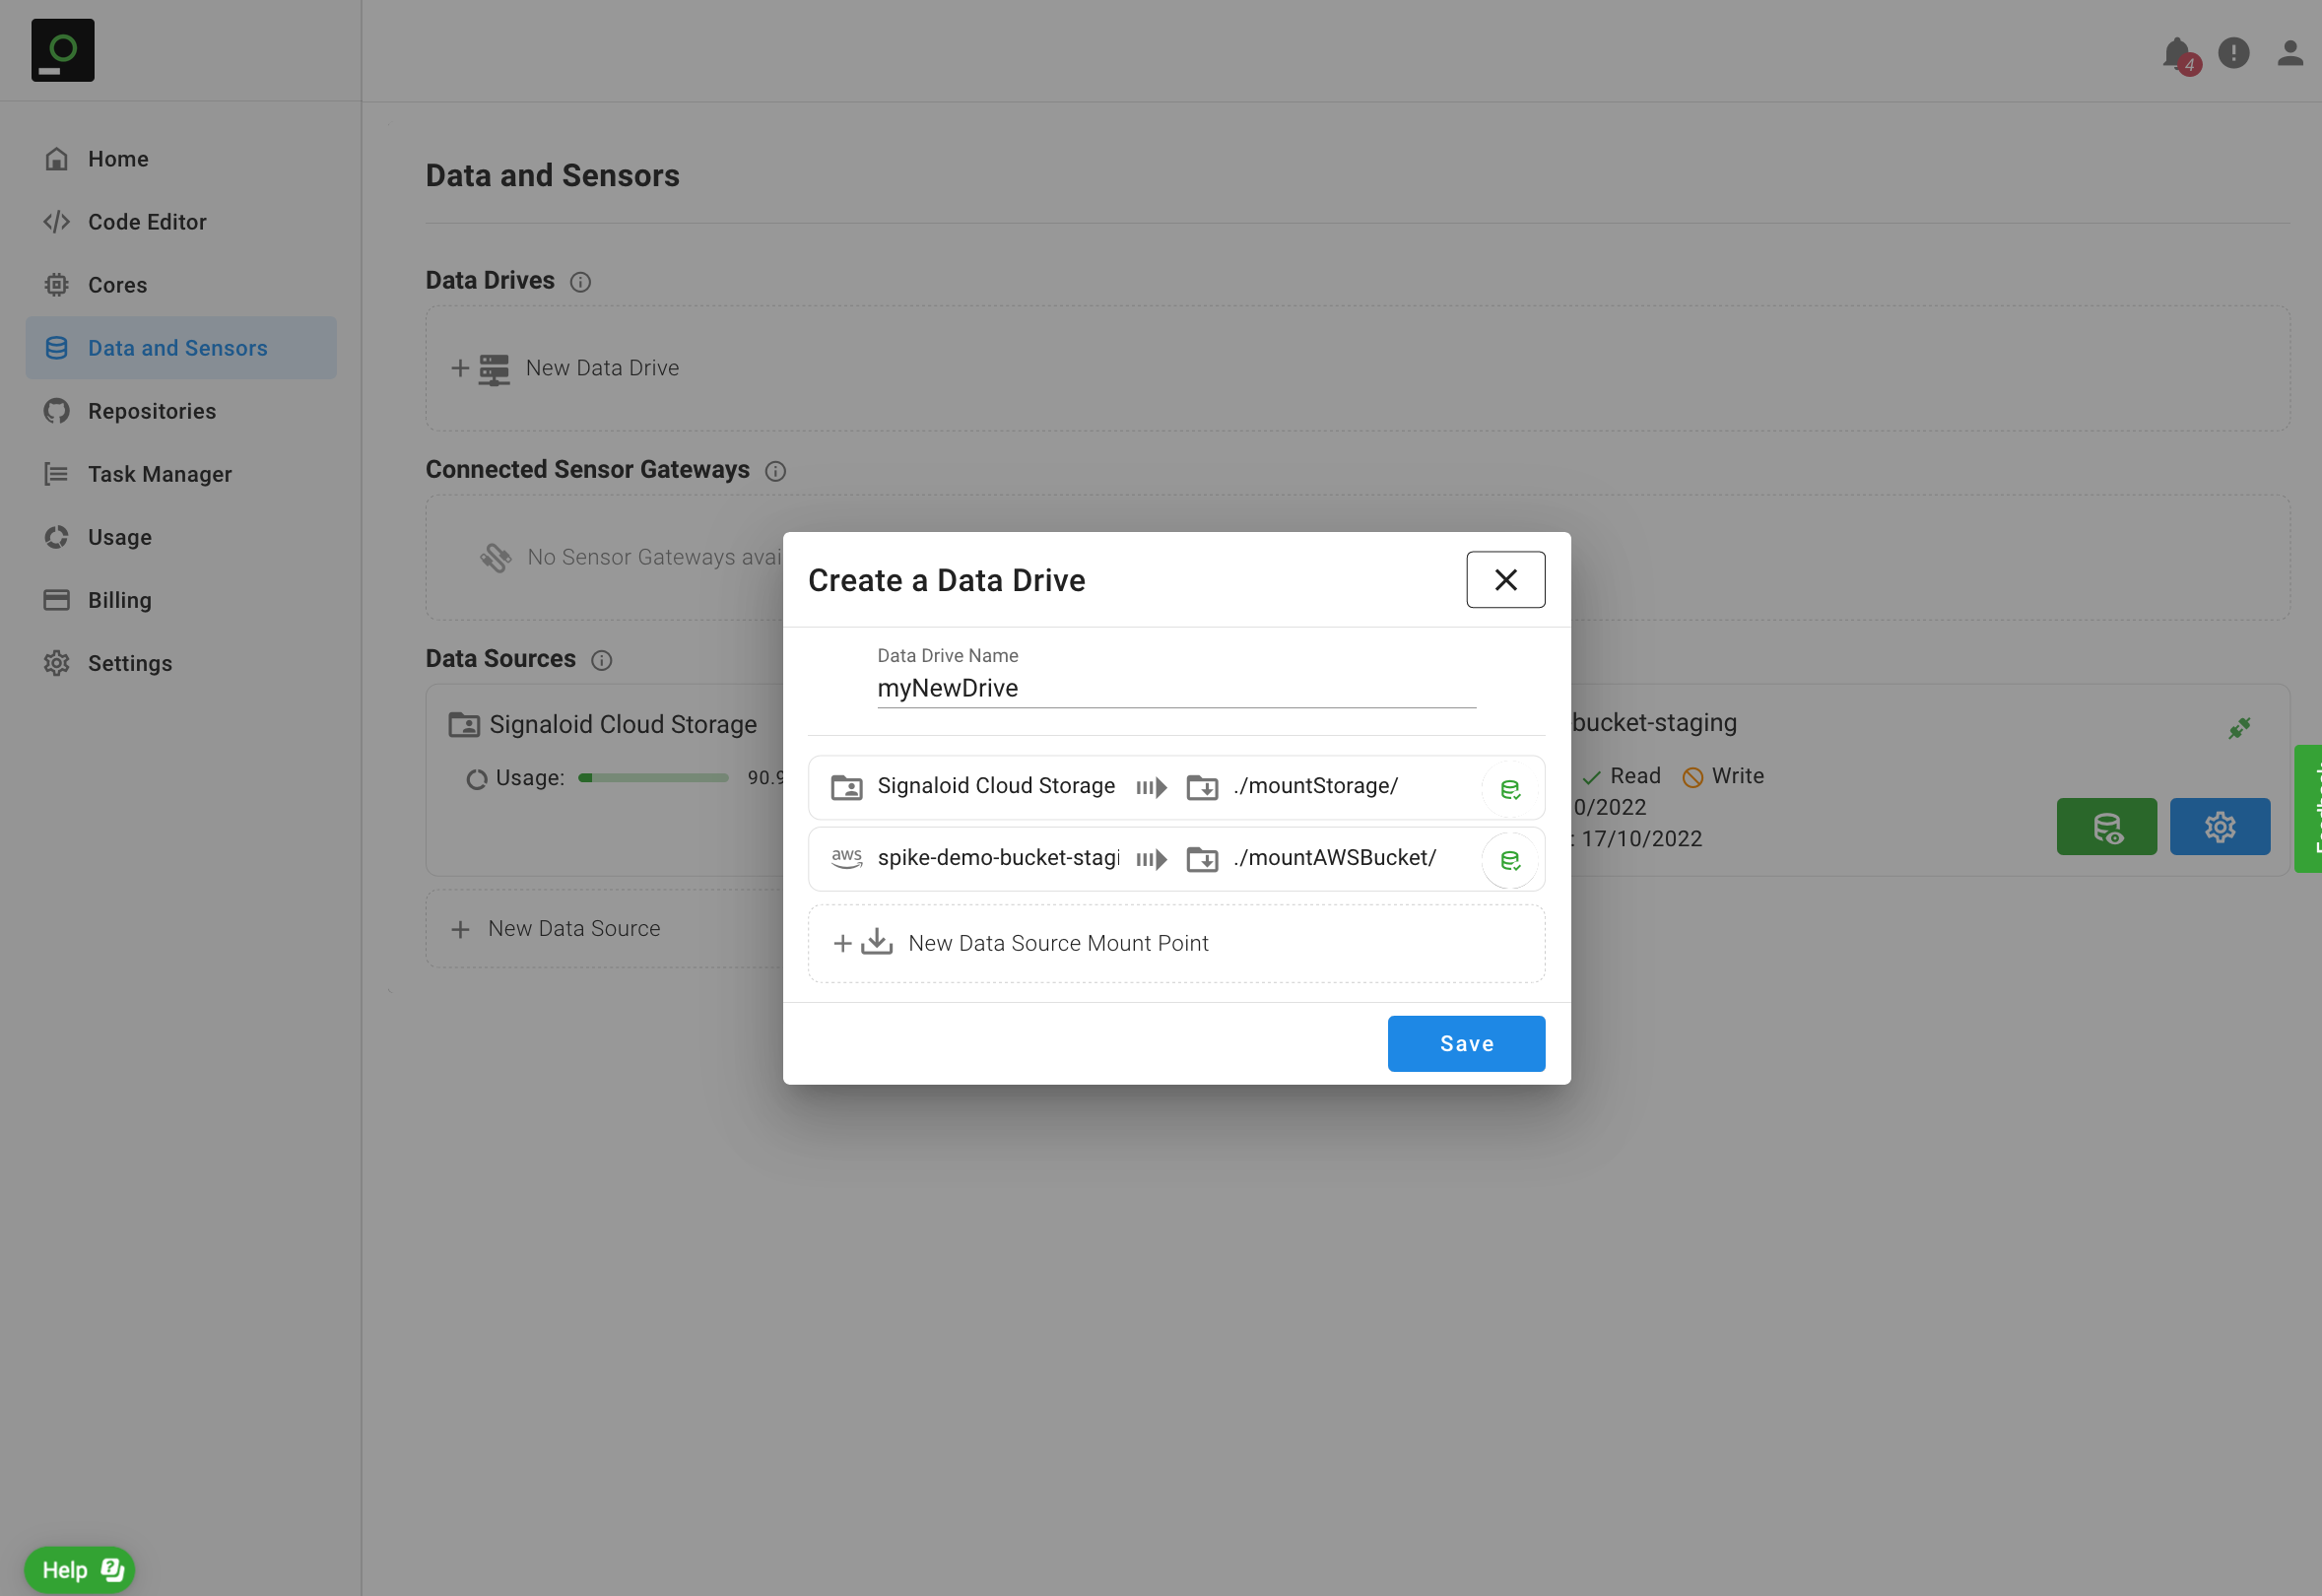
myNewDrive that includes two Data Sources, i.e., the Signaloid Cloud Data Storage mounted at the mountStorage mount point and an additional AWS S3 bucket mounted at mountAWSBucket. Both these mount location are relative to the eventual mount location of the Data Drive. Click on the "Save" button to create the new Data Drive.Figure 7 shows the Data and Sensors page which includes the myNewDrive Data Drive in the Data Drives section. You can use the "Edit Drive Configuration" () button to configure a Data Drive and "Disconnect" () button to remove a Data Drive.
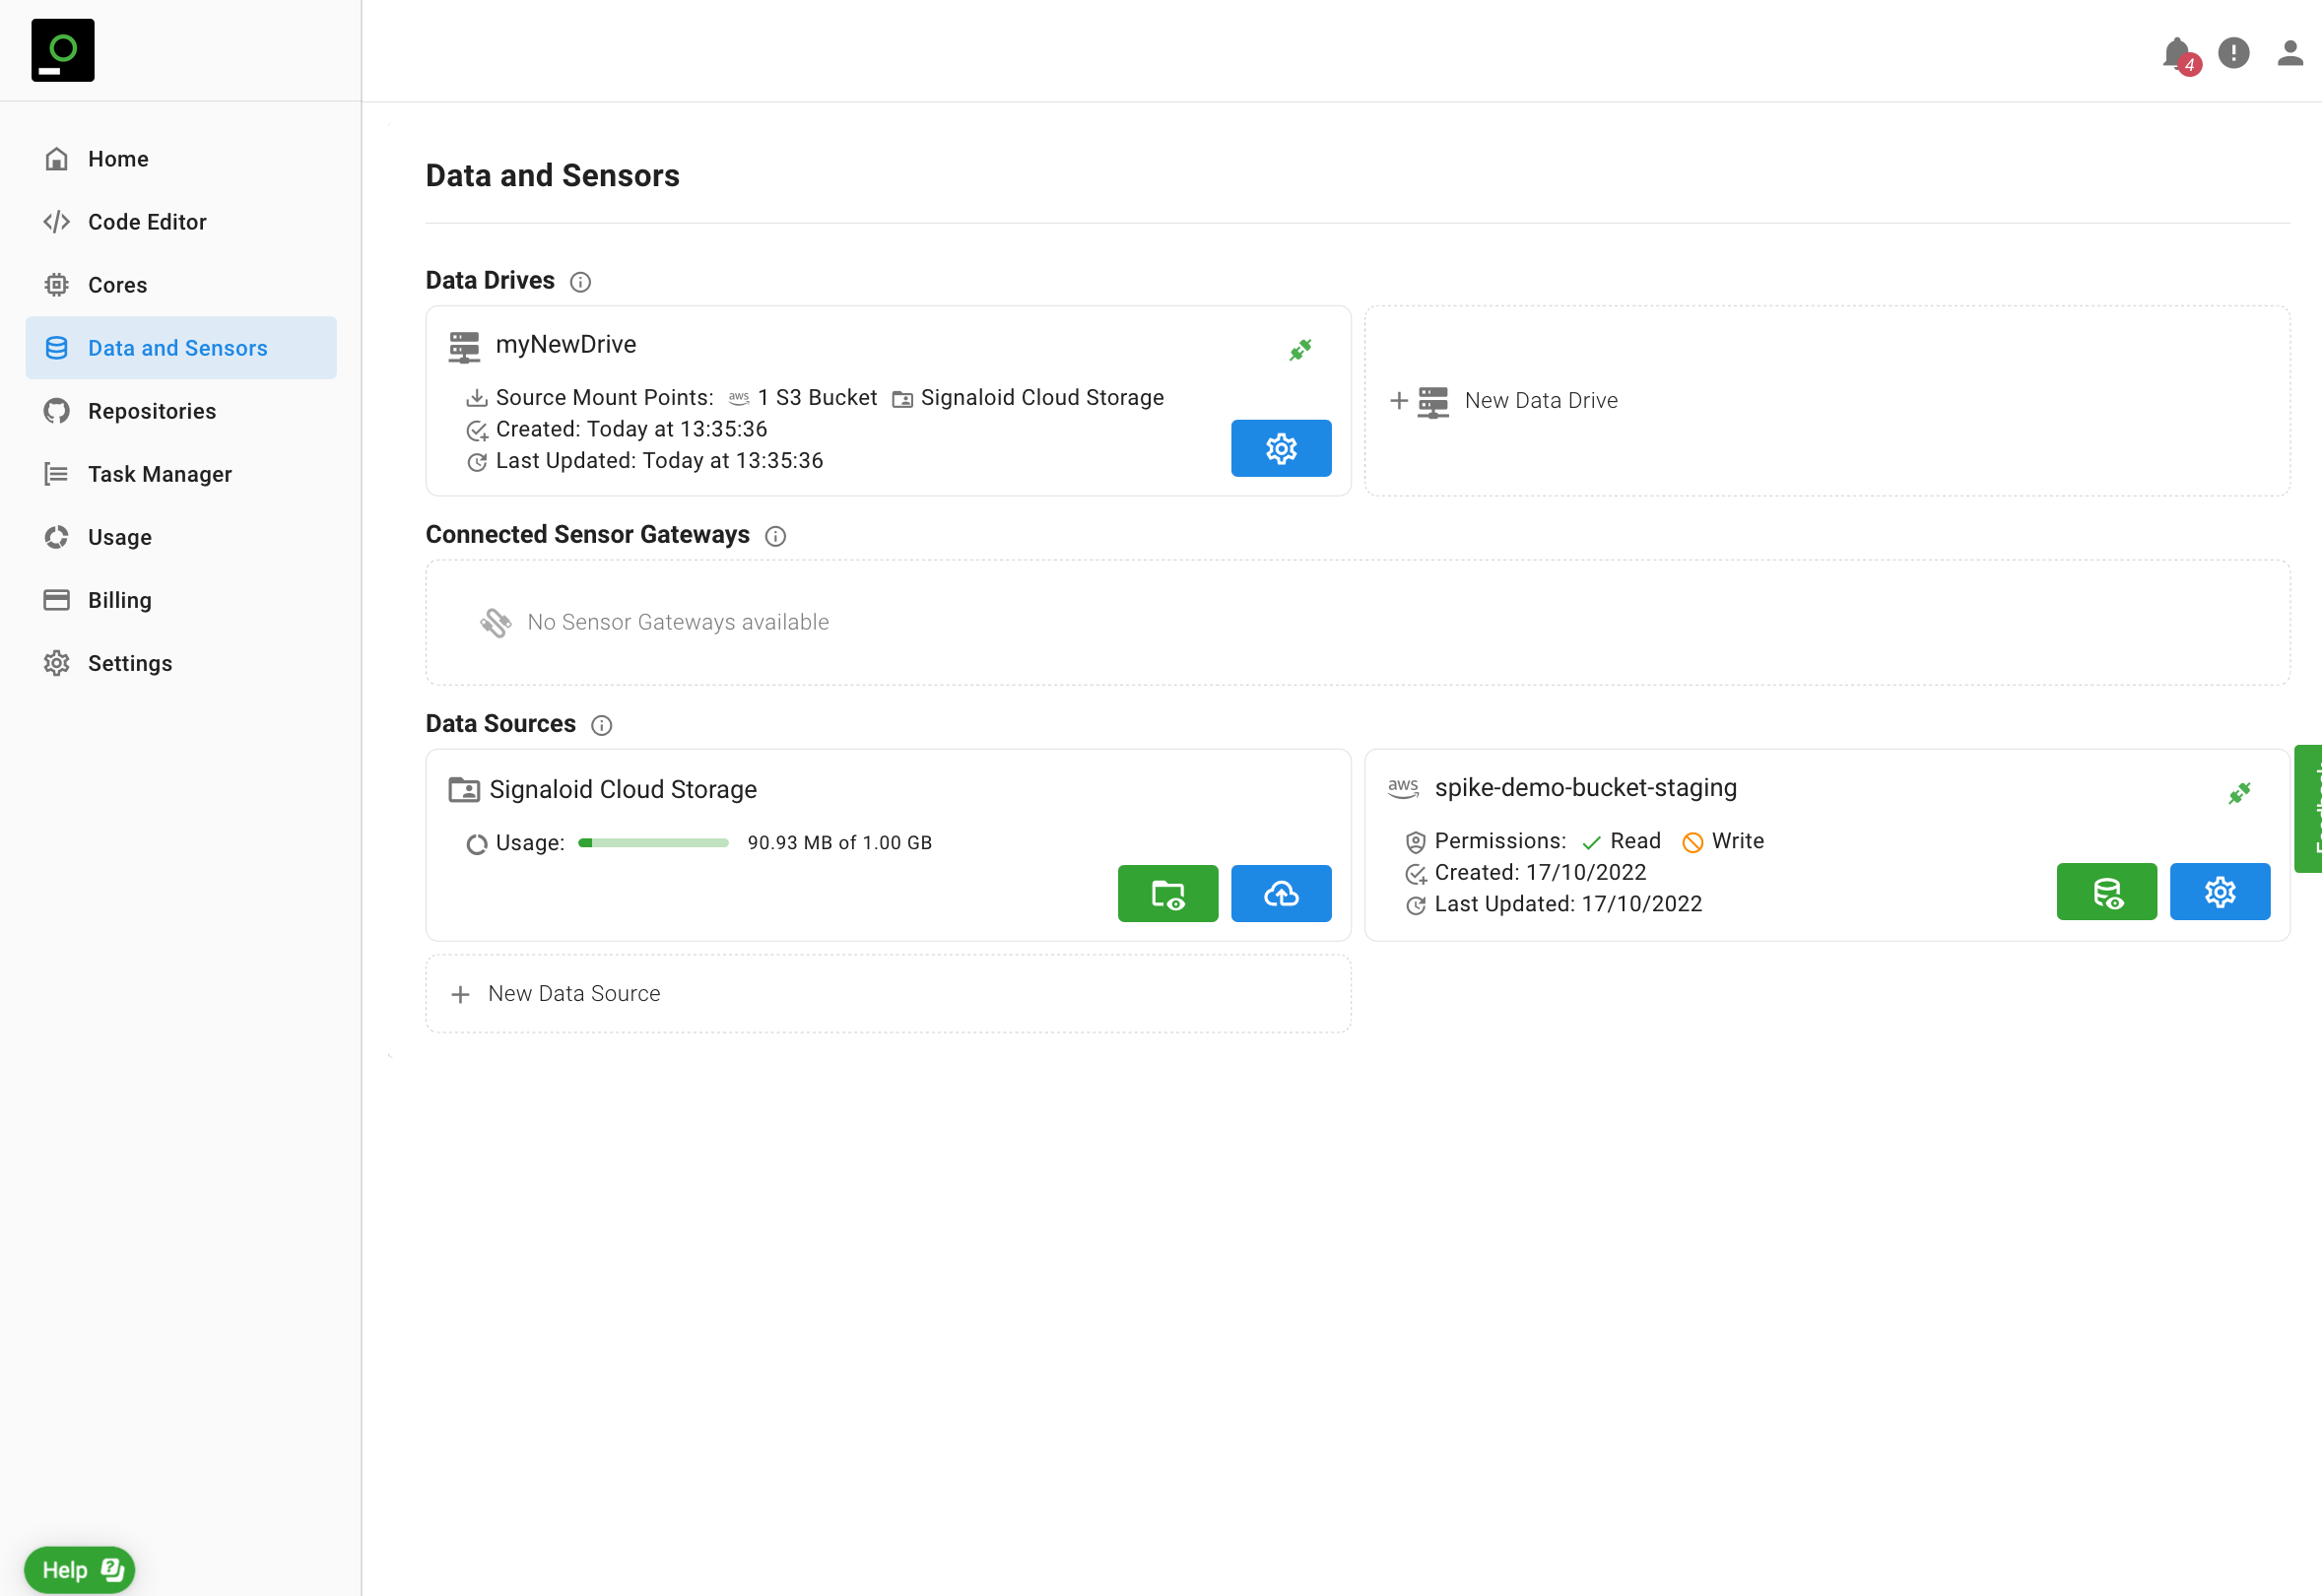
myNewDrive Data Drive in the Data Drives section.After the creation of the new Data Drive, you will be able to mount it before running your application from the Code Editor or using a connected GitHub repository. You can see how all the Data Sources and the new Data Drive are available options. See the Code Editor reference section for details of how to mount a Data Source for an application running from the Code Editor. See the connected GitHub Repositories reference for details of how to mount a Data Source when you run one of your connected GitHub repositories on one of the Signaloid C0 cores. Figure 8 shows an example of the available options in the "Mount Data Source" option of the Code Editor. To mount the new Data Drive you need to specify its mount location. If for example you specify the mount location as myNewDriveMount, then your application will be able to access the Signaloid Cloud Storage using the path myNewDriveMount/mountStorage and the additional AWS S3 bucket using the path myNewDriveMount/mountAWSBucket.
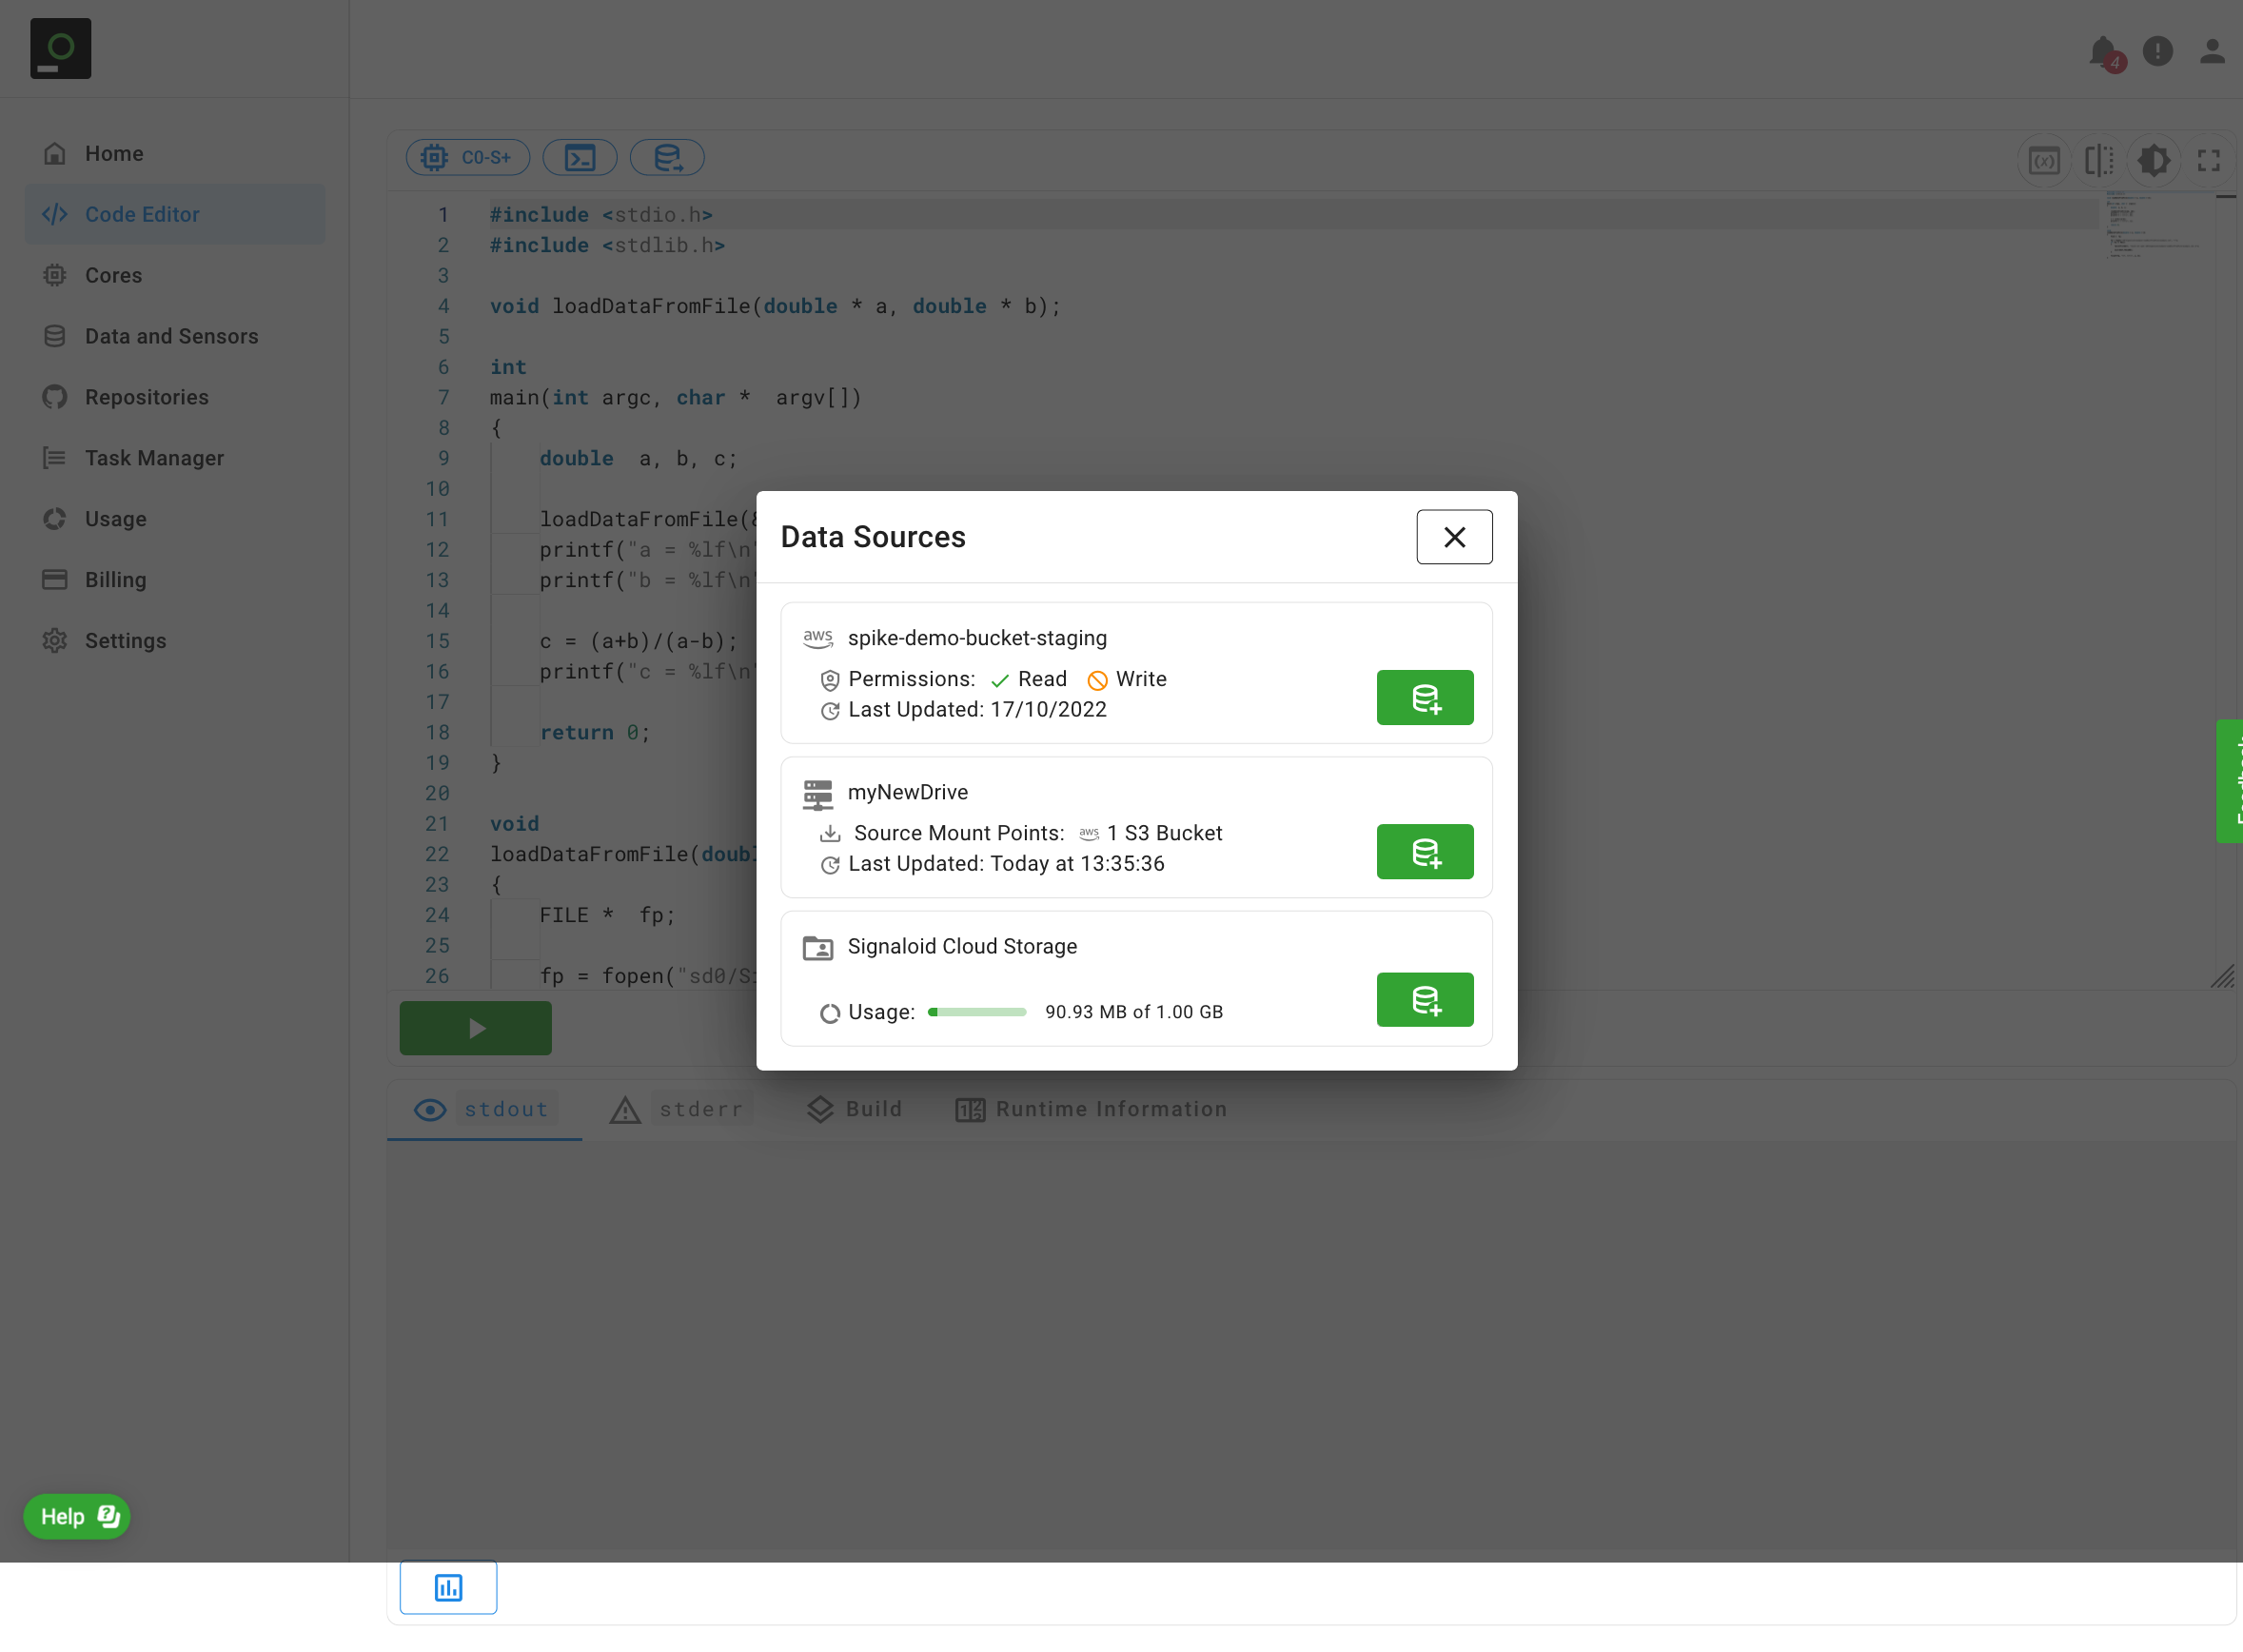
myNewDriveMount, then your application will be able to access the Signaloid Cloud Storage using the path myNewDriveMount/mountStorage and the additional AWS S3 bucket using the path myNewDriveMount/mountAWSBucket.